
SMERGE
Visual Performance System
AortaLabs
Table of Contents
- 01 Application Overview
- 02 Source Manager
- 03 Fader Bank
- 04 Mod Patch Bay
- 05 FX Params
- 06 XY Pad
- 07 Shader Editor
- 08 Scene Launcher
- 09 MIDI Map
- 10 Tap Tempo
- 11 Settings
- 12 Output
- 13 Mask Editor
- 14 Art-Net / DMX
- 15 AI Shader Generator
- 16 Step Sequencer
- 17 Ableton Link
- 18 Per-App Audio Capture
- 19 CV / M-Gate Input
- 20 Media Library
System Requirements
SMERGE renders up to 8 simultaneous video layers in real time using WebGL 2.0. The GPU is the most important factor for smooth performance — everything else is secondary.
| Component | Minimum | Recommended |
|---|---|---|
| GPU | Intel integrated graphics (frame drops expected on complex shaders) | Apple Silicon M1 or dedicated AMD / NVIDIA with 2 GB+ VRAM |
| RAM | 8 GB | 16 GB (headroom for other live-set apps) |
| CPU | 4-core, 2018 or newer | Apple Silicon M1+ (fanless, efficient for live use) |
| Storage | Any | SSD — required for smooth video file playback and scrubbing |
| Display | 1280 × 800 | 1440 px wide or more — the mixer panel is dense at small widths |
| OS | macOS 12 Monterey | macOS 13 Ventura or later |
Performance tip: If you experience dropped frames, reduce generator complexity first (switch to simpler built-in sources), then check that no other GPU-heavy app is running. Apple Silicon machines generally sustain real-time performance at 60 fps without a fan spinning up.
Thank You
SMERGE is an independent project built by a solo developer with a love for live visual performance. Every person who downloads, uses, and shares this tool is directly making it possible to keep building.
Your support — whether through word of mouth, feedback, bug reports, or simply choosing SMERGE for your set — means everything. This software exists because of people like you who believe that artists should have serious tools without serious price tags.
SMERGE is still growing. The roadmap is shaped by the community, and every feature in this manual started as a real need from a real performer. If there's something you wish it could do, reach out — you might just see it in the next version.
Application Overview
SMERGE is a real-time visual performance tool built for live VJ work, generative art, and audiovisual performance. The interface is divided into six primary panels, all visible simultaneously, designed so you can mix, modulate, and perform without switching screens.

The Interface at a Glance
The main window is divided into four zones:
- Top left — Preview canvas (live composited output)
- Top right — Mod Patch Bay (modulation routing)
- Center right — FX Params and XY Pad side by side
- Bottom left — Fader Bank (channel compositing controls)
- Bottom right — Source Manager (channel content assignment)
Title Bar
The title bar runs across the top of the application and contains global controls.
| Control | Function |
|---|---|
| Preset name | Displays the current preset name. Click to rename. |
| New | Clears the current session and creates a blank preset. |
| Load | Opens a file browser to load a .smx preset or .smxz bundle file. |
| Save | Saves the current session as a .smx preset file. When a preset is already open, Save overwrites it directly; use Save As… (⌘⇧S or shift-click) to save a copy under a new name. Media sources are referenced by file path — moving or deleting the original files breaks the preset. |
| Collect | Save & Collect — saves the session as a single .smxz bundle containing the preset plus copies of every referenced asset: video, audio, images, 3D models, and any shader-library shaders in use. Share the one file with anyone; when loaded, assets are unpacked to Documents/SMERGE/Assets/<name>/ and everything plays without the original files. |
| Shader | Opens the Shader Editor for writing custom GLSL generators. |
| MIDI | Opens the MIDI Router for assigning hardware controls. |
| Scenes | Opens the Scene Launcher for saving and recalling snapshots. |
| Tempo | Opens the Tap Tempo / BPM tool. |
| Output | Opens the Output Manager for routing to a second display or Syphon. |
| ♫ Track | Opens the Audio Track player for loading backing audio. |
| BPM | Displays the current global tempo. All BPM-synced LFOs and envelopes lock to this value. |
| REC | Starts/stops canvas recording. |
Preview
The Preview panel occupies the upper-left and shows the live composited output at all times. What you see here is exactly what is sent to your second display and Syphon output. The FPS counter in the top-right corner monitors render performance. The preview is fully interactive — if a Live Drawing source is active, you can draw directly onto this canvas.
Layout Panels
Every panel in SMERGE can be repositioned and resized. The ≡ icon in a panel header moves it to a different zone; the ⊞ icon pops it out as a floating window. Drag panel dividers to resize. Save and recall complete layout states using the Layout menu in the title bar.
Keyboard Shortcuts
| Shortcut | Action |
|---|---|
| ⌘+ | Zoom in — enlarges the entire UI. Useful on high-density or small displays. |
| ⌘− | Zoom out. |
| ⌘0 | Reset zoom to 100%. |
| ⌘Z | Undo — reverses text edits in any text field. |
| ⌘C / ⌘V | Copy / Paste in any text field. |
| ⌘S | Save preset — overwrites the file you have open (or saves the current shader when the Shader Editor is open). First save of a new session asks for a name. |
| ⌘⇧S | Save preset as… — always asks for a new name/location. |
| ⌘N | New preset. |
| ⌘, | Open Settings. |
| ⌘/ | Keyboard shortcut reference — a floating panel with every shortcut, including the Mask Editor tools. Also in the Help menu. |
| ` | Performance mode — hides side panels for a maximized preview. |
| Right-click | Context menu with Cut / Copy / Paste / Select All on any editable field. |
Source Manager
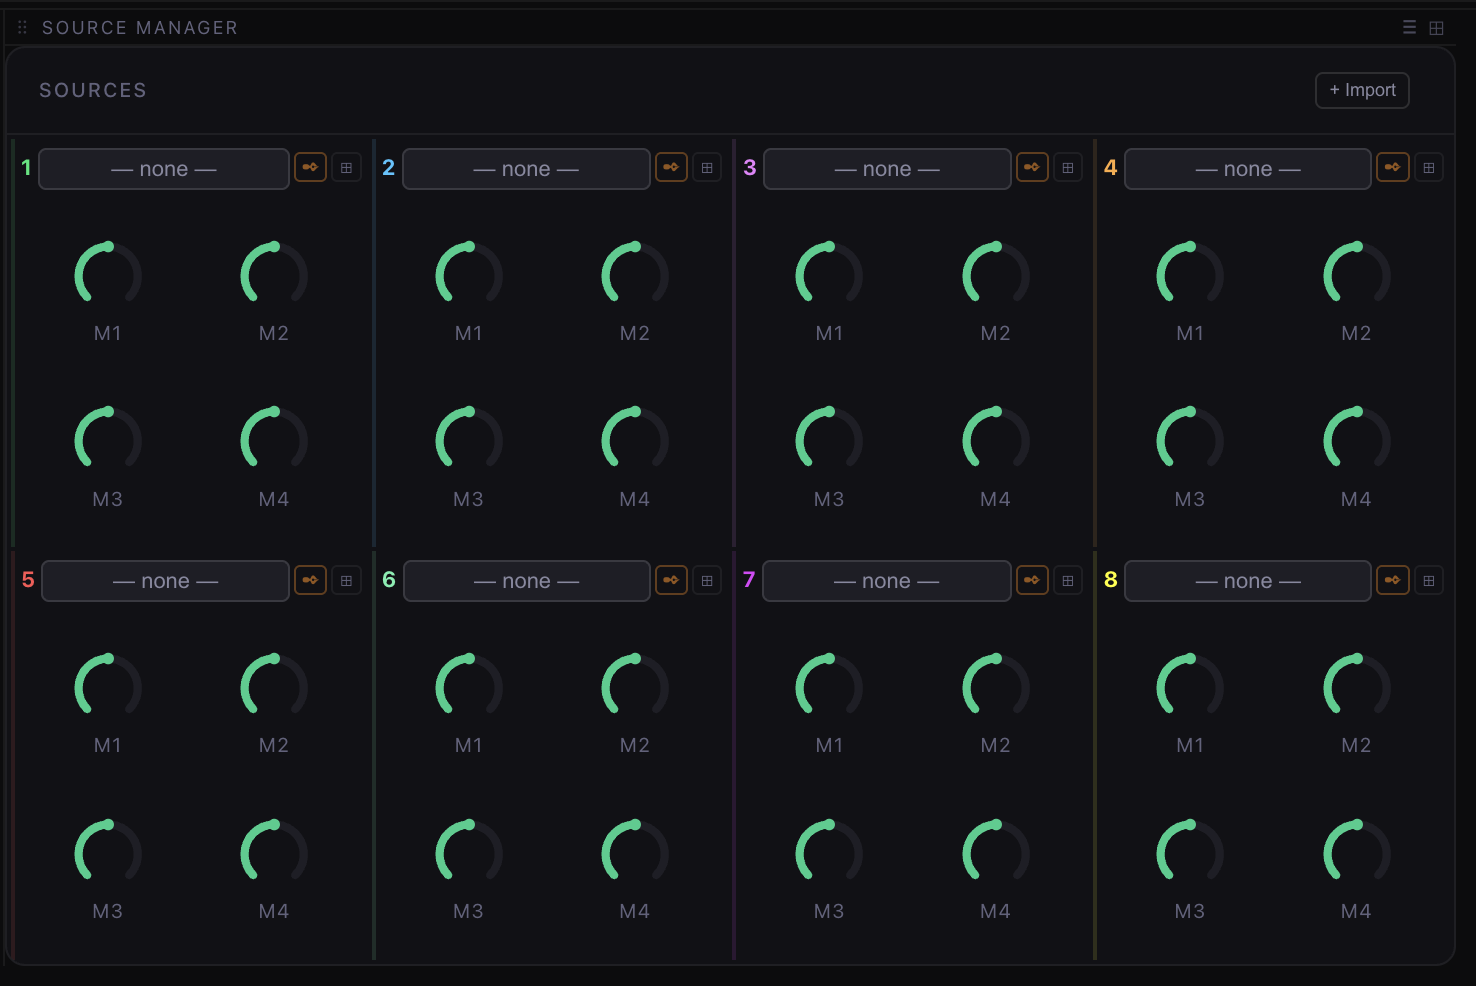
The Source Manager is where all visual content enters SMERGE. It provides 8 independent channels arranged in a 4×2 grid, each capable of running a different source simultaneously. Channels are color-coded consistently throughout the entire application — the same color that labels a channel here appears on its fader, its mod matrix column, and its audio meter.
Loading a Source
Click the — none — dropdown at the top of any channel slot to open the source picker. Sources are organized into categories:
| Category | Description |
|---|---|
| Generators | Built-in GLSL shaders — plasma fields, fractals, geometry, particle systems, and more. Render in real time with no file required. The Mapping category contains test patterns (Test Grid, Test Corners, Test Bars) designed for projection alignment and calibration. |
| Video | Pre-loaded video clips (MP4, MOV, WebM, MKV). Loop, scrub, and sync to BPM. |
| Camera | Live webcam or video capture card feed. |
| Image | Still images (PNG, JPG, WebP, GIF) loaded via the + Import button. Rendered with GPU-accelerated scale, rotation, position, and hue-shift macros. |
| Image Stack | A set of 2–32 still images loaded together as one scrubbable "wavetable" source — step through frames with a macro knob, crossfade between them, or auto-advance in sync with the beat. Loaded via + Import → ▦ Image Stack…. See Image Stack below. |
| 3D | GLB or GLTF 3D model with real-time camera orbit, zoom, and lighting controls. Also loads Gaussian Splat scans (.ply, .splat, .ksplat) — see Gaussian Splats below. |
| Live Drawing | A persistent paint canvas. Draw directly on the Preview with your mouse or stylus. Strokes accumulate and fade over time. |
| Text Layer | GPU-rendered text with custom font, color, glow, and animations. All parameters are modulatable. |
To load a file-based source (video, 3D model), click + Import in the top-right corner or use the dropdown's import option. Files are referenced from their original location — SMERGE does not copy them.
Channel Thumbnail
Once a source is assigned, the black preview area shows a live thumbnail of that channel's output before compositing. This lets you monitor all 8 channels independently while the main Preview shows the final blended result.
Macro Knobs — M1, M2, M3, M4
Each channel has four macro knobs below its thumbnail. What these knobs control depends on the source type:
For Generators (GLSL shaders): Macros map directly to the shader's u_macros[0–3] uniforms. Each shader defines what M1–M4 do — common mappings include color palette, speed, density, symmetry, or pattern scale.
For 3D sources: M1–M4 are remapped to camera parameters: azimuth, elevation, distance, and field of view.
For Video: Macros are available for modulation routing but do not directly alter playback.
For Still Images (PNG, JPG, WebP, GIF) and Camera: M1–M4 control real-time GPU transforms applied before compositing:
| Macro | Parameter | Range |
|---|---|---|
| M1 | Scale | 0.25× (zoomed out) to 4× (zoomed in). At 0.5 (center), the image fills the canvas at 1:1. |
| M2 | Rotation | −180° to +180° |
| M3 | X Position | −1 to +1 UV units (full frame horizontal shift) |
| M4 | Hue Shift | −180° to +180°. Rotates the hue wheel — shift by 180° to invert colors. |
These transforms are computed on the GPU before compositing. Pixels outside the image boundary after transformation are transparent — so scaling a PNG down reveals the channels underneath rather than leaving a colored rectangle.
Text Layer
Select Text Layer from the source picker to add GPU-rendered text to a channel. After assigning, a T Edit Text button appears below the channel thumbnail — click it to open the text editor panel.
| Control | Function |
|---|---|
| Text area | Enter text content. Use \n for line breaks. |
| Font | Opens a searchable picker listing every installed font on your system. |
| Size | Font size in pixels (10–400). Right-click to assign a mod source. |
| B / I | Bold and italic toggles. |
| ⬅ ⬛ ➡ | Text alignment: left, center, right. |
| ◑ Rain | Rainbow mode — cycles each character through the full hue spectrum. |
| Text / BG | Text color and background color pickers. Check Transp. to make the background transparent (great for overlaying text on other channels). |
| X / Y | Position sliders for the text block within the frame. |
| Spc | Letter spacing in pixels. Right-click to assign a mod source. |
| Glow | Glow blur radius (0–60). Right-click for mod. The color swatch sets the glow color, which defaults to the text color. |
| Anim | Animation preset: Static, Pulse, Wave, Typewriter, Scramble, or Scroll (four directions). A ♩ button toggles BPM sync; when active, choose a musical division (4/1 down to 1/16) to lock the animation cycle to tempo. |
Image Stack
An Image Stack loads a set of still images (2 to 32 files) as one source that scrubs, crossfades, and auto-advances between frames — a "wavetable" for images, useful for stop-motion montage cuts, glitch-style image cycling, and rhythmic photo/texture sequences timed to the music.
Create one from any channel's source picker: + Import → ▦ Image Stack…. Select 2 or more image files (PNG, JPG, WebP, GIF) in the file dialog — SMERGE loads all of them as a single source named after the first file (e.g. "photo1.png +3 (stack)").
Image Stack sources use a distinct macro mapping in place of the scale/rotation/position/hue transform used by single still images:
| Macro | Parameter | Behavior |
|---|---|---|
| M1 | Scrub | Selects a frame from the stack. 0.0 = first image, 1.0 = last image, evenly divided across however many frames are loaded. |
| M2 | Blend | Crossfades between the current frame and the next one. 0 = a hard cut at the current frame, 1 = fully blended into the next. |
| M3 | Auto | Auto-advance. At 0, the stack is static and only responds to Scrub (M1). Above 0, the stack advances through frames on its own — see Free-Running vs. Clock-Synced below. |
| M4 | Hue | Hue shift, same convention as still images: −180° to +180°, centered at 0.5. |
Free-Running vs. Clock-Synced Auto-Advance
When Auto (M3) is active, a small ♩ Sync toggle appears next to the macro knobs. It switches what the Auto knob's range means:
| Mode | Behavior |
|---|---|
| Free-running (default) | Auto sweeps a continuous frame rate from 0 to 30 fps. Not locked to the beat — useful for organic, non-rhythmic flicker. |
| ♩ Synced | Auto instead selects a musical division from 2 bars (slow) down to 1/96 (very fast, matching common 96-PPQN sequencer resolution) — the stack advances exactly on the beat, staying in time with everything else in the set. The toggle button shows the currently selected division, e.g. ♩ 1/8. |
The Auto knob remains the single control in either mode, so MIDI mapping, LFOs, and the Step Sequencer can all still drive it — switching Sync on just changes what the knob's position means.
Gaussian Splats
SMERGE loads 3D Gaussian Splat scans — photoreal captured 3D, the current frontier in 3D scanning — as a 3D source, alongside GLB/GLTF models. Scan a room, street, or backstage with a free phone app (Luma, Polycam, or Apple's own Scaniverse), export a .ply, .splat, or .ksplat file, and load it just like any other 3D model — + Import or drag the file straight onto a channel.
Once loaded, a splat scene uses the exact same camera controls as a GLB/GLTF model: the Az / El / Dst / FOV macro knobs orbit, tilt, push in, and widen the lens, and the scene is automatically centered and scaled to a sensible starting distance regardless of how large the original scan was.
Beat-Synced Camera Motion
Below the camera sliders, a Cam row offers three motion presets that drive the camera automatically, locked to the master tempo rather than wall-clock time — they follow tempo changes and stay in sync between the main window and the projector output:
| Preset | Motion |
|---|---|
| Orbit | Continuous rotation around the scene — a full revolution every 4 bars at 100% Amt. |
| Dolly | A slow push-in/pull-out breathing cycle, one full cycle every 4 beats. |
| Kick | A sharp lens-widening punch that lands right on each beat and decays before the next — a camera-level "kick" to match a bass hit. |
An Amt slider (0–100%) sets the strength of whichever preset is active, and — like the other 3D camera parameters — can be right-clicked to assign an LFO, envelope, or audio band. Motion presets work on any 3D source, not just splats, so a GLB model can pick up the same beat-synced orbit for free.
Mask Button (✒)
Each channel card contains a small ✒ button. Clicking it opens the Mask Editor — a bezier drawing tool that lets you trace any shape around a surface and mask the channel to it. This is the primary tool for projection mapping.
The button is orange-tinted when no mask path exists, glows orange when a path is saved but the mask is toggled off, and turns blue while the mask is active. See Chapter 13 — Mask Editor for the full workflow.
Channel Colors
| Channel | Color |
|---|---|
| 1 | ■ Green |
| 2 | ■ Blue |
| 3 | ■ Purple |
| 4 | ■ Yellow |
| 5 | ■ Red |
| 6 | ■ Teal |
| 7 | ■ Violet |
| 8 | ■ Gold |
Fader Bank
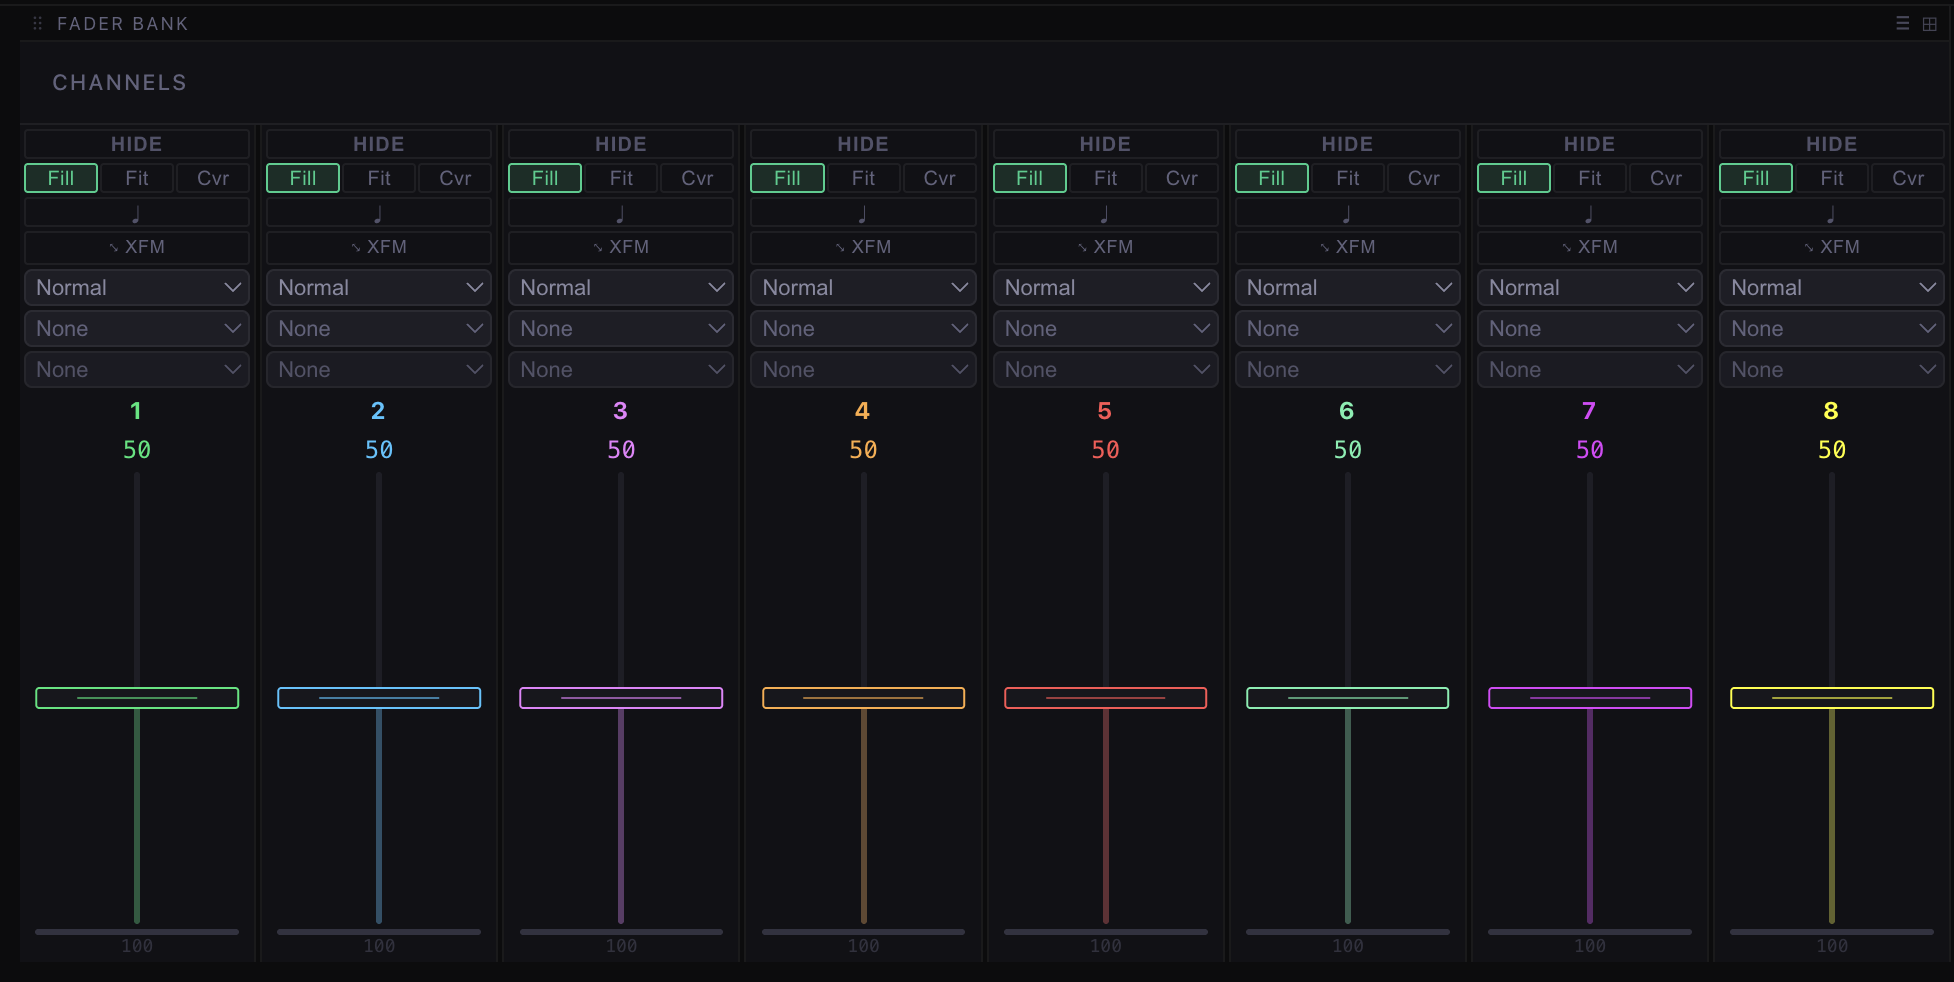
The Fader Bank contains the compositing controls for all 8 channels. Every channel strip is independent — you can set different blend modes, effects, and opacity levels for each one simultaneously. Strips are color-coded to match the Source Manager and Mod Matrix.
Channel Strip — Top to Bottom
HIDE
Mutes the channel from the composite output without losing any of its settings. The channel continues processing in the background — toggling it back on is instant with no reload. Use this to pre-build a layer and drop it in at the right moment during a performance.
Scale Mode — Fill / Fit / Cvr
Controls how the source is scaled inside the composite frame:
| Button | Behavior |
|---|---|
| Fill | Stretches the source to fill the full output frame, ignoring aspect ratio. |
| Fit | Scales the source to fit entirely within the frame, preserving aspect ratio. Letterboxing may appear. |
| Cvr | Scales the source to cover the full frame, preserving aspect ratio. Edges may be cropped. |
♪ BPM Sync
Syncs the channel's video playback or generator animation speed to the global BPM. When active, the source loops in time with the tempo.
∿ XFM — Transform
Opens the transform controls for this channel: X position, Y position, Scale, and Rotation. All four parameters are individually available as Mod Matrix targets.
Blend Mode
| Mode | Effect |
|---|---|
| Normal | Standard alpha composite — opacity controls transparency. |
| Add | Adds pixel values; brightens the result; great for light and glow sources. |
| Multiply | Darkens by multiplying values; useful for texture overlays. |
| Screen | Inverse multiply; lightens without blowing out highlights. |
| Overlay | Contrast blend that preserves midtones. |
| Difference | Subtracts pixel values; creates inversion effects. |
| Exclusion | Softer version of Difference. |
| Lighten / Darken | Keeps only the lighter or darker pixel per channel. |
| Hue / Luminosity | HSL mode blends — applies the hue or luminosity of this layer to the base. |
| Color Dodge / Burn | Photoshop-equivalent dodge and burn blend modes. |
| Vivid Light | Combines dodge and burn for extreme contrast results. |
| Exclusion | Softer version of Difference. |
| Hard Light | Contrast blend weighted toward this layer rather than the base. |
| Mask | Uses this layer's luminance to cut through the accumulated composite — white areas reveal everything below, black areas hide it. |
| Mask Inv | Inverted mask — black areas reveal the composite, white areas cut it. |
Clip to Channel
When a channel is set to Mask or Mask Inv blend mode, a Clip: dropdown appears in the channel strip. By default it reads Clip: all — meaning the mask punches through every layer below it in the composite.
Set the dropdown to a specific channel (e.g. Ch 1 — Green) to clip the mask to that channel only. When a clip target is selected:
- The mask layer cuts only through the nominated channel, leaving all other channels composited normally behind it.
- This lets you, for example, write text on Channel 1 and use a mask on Channel 2 to reveal only the text while keeping Channels 3–8 fully visible.
- The clip target dropdown highlights in accent color when a specific channel is selected, as a visual reminder.
FX Slots (×2)
Each channel has two independent effect slots stacked vertically. Effects are applied in order — slot 1 first, then slot 2 — before the blend mode is calculated. Selecting an effect here makes its parameters available in the FX Params panel.
Vertical Fader
The main opacity control for the channel. Drag up to increase, down to decrease. When an LFO or envelope is routed to the fader, the thumb animates in real time to show the live modulated value — giving you a visual read of the modulation depth without leaving the Fader Bank.
Audio Meter Bar
The colored horizontal bar is a live audio reactivity meter. Its brightness and width reflect the audio energy being fed to that channel.
Mod Patch Bay
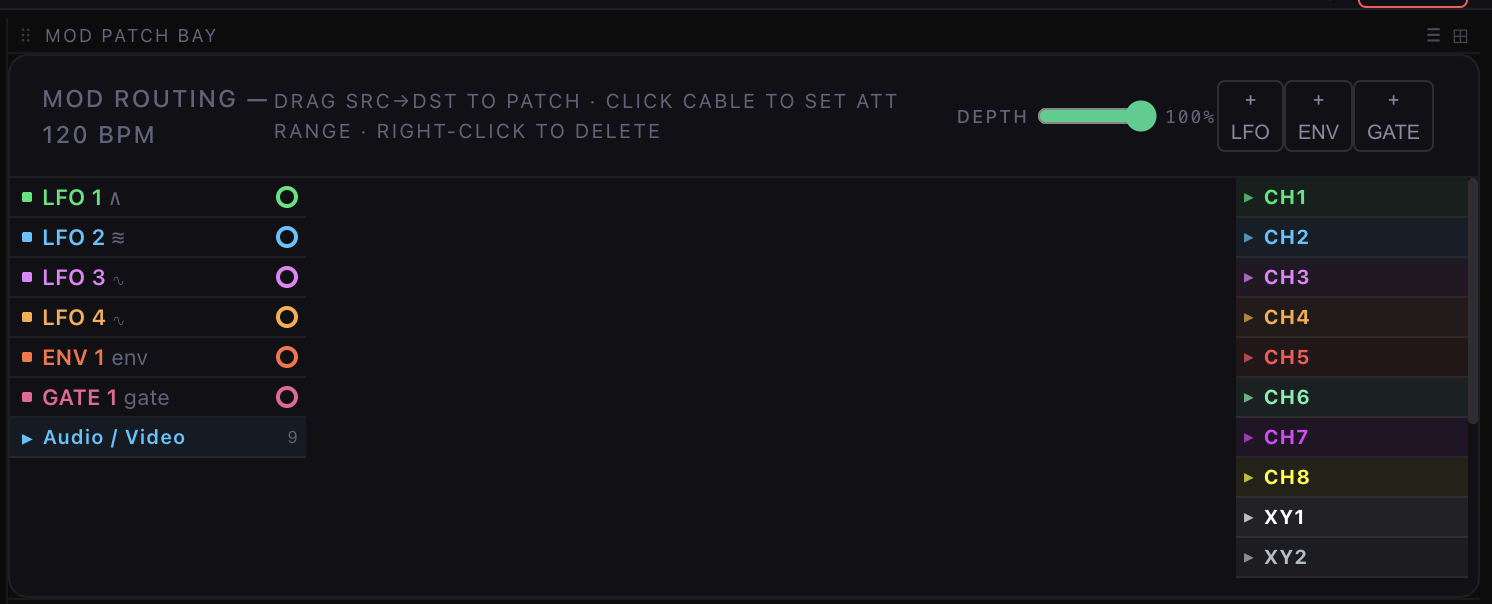
The Mod Patch Bay is SMERGE's modulation routing engine. It connects modulation sources — LFOs, envelopes, and audio signals — to destination parameters across all 8 channels and the XY pad. Every connection is visual, real-time, and independently adjustable.
Header
MOD ROUTING — [BPM] displays the current global tempo. The instruction line summarizes the three core interactions:
- DRAG SRC→DST — draw a cable from a source node to a destination to create a route
- RIGHT-CLICK CABLE — opens options to remove or inspect an active connection
- CLICK LFO/ENV TO EDIT — opens the inline editor for that modulation source
DEPTH Slider
Sets the modulation depth for the next cable you draw. At 100% the modulation source drives the destination across its full range. At negative values the modulation is inverted. Adjust this before drawing a cable to set the initial depth, or right-click an existing cable to change it after the fact.
+ LFO / + ENV / + GATE / + CV / + M-Gate
| Button | Action |
|---|---|
| + LFO | Adds a new Low Frequency Oscillator to the source list. |
| + ENV | Adds a new ADSR envelope to the source list. |
| + GATE | Adds a beat-triggered gate — pulses in sync with kick/beat events. |
| + CV | Adds a continuous CV input channel from a DC-coupled audio interface (see Chapter 17). |
| + M-Gate | Adds a voltage-threshold gate from a DC-coupled audio interface (see Chapter 17). |
Up to 8 LFOs, 8 envelopes, and 8 gates can be active simultaneously. CV and M-Gate inputs are only useful if you have a DC-coupled audio interface (e.g. ES-8, RME Fireface, Focusrite Gen 4) connected with Eurorack or modular CV signals.
Source List (Left Column)
All available modulation sources appear on the left. Each row has a colored square indicator and a circular output node on the right edge — the drag handle for creating connections.
Gates — added with + GATE. Click a gate label to open its inline editor (depth, pulse width). A gate outputs 1 on the beat and 0 between beats — ideal for hard snapping of opacity, scale, or flash effects.
The Audio / Video group is a collapsible section containing all audio-reactive sources:
| Source | Signal |
|---|---|
| Sub | Sub-bass energy (20–60 Hz) |
| Bass | Bass energy (60–250 Hz) |
| Mid | Midrange energy (250 Hz–4 kHz) |
| High | High frequency energy (4–20 kHz) |
| RMS | Overall loudness |
| Beat | Pulse on detected kick/beat events |
| Manual | Hand-controlled slider for performance |
| Luma | Brightness from a live camera or video source |
| Mtn | Motion detected from a live camera feed |
The CV / M-Gate group appears below Audio / Video when you have added one or more CV or M-Gate inputs. Clicking a CV or M-Gate row opens the CV Inspector at the top of the panel:
| Control | Description |
|---|---|
| Dev | Audio interface device picker. Updates automatically when you plug or unplug hardware. |
| Ch | Physical input channel on the interface that carries the CV or gate signal (1–8). |
| Live readout | Current raw voltage displayed as a number (−1.00 to +1.00), updated ~12 times per second. |
| Oscilloscope | 170 × 58 px rolling waveform showing ~3 s of signal history at 60 fps. Center line = 0 V. M-Gate shows a dashed threshold line. |
| Thr (M-Gate) | Threshold voltage. Gate outputs 1 when the signal is above this value, 0 otherwise. |
| × Remove | Deletes the source and removes all of its active cables. |
Destination List (Right Column)
Click the ▶ expand arrow on any channel to reveal individual target parameters:
| Target | What it controls |
|---|---|
| Opc | Channel opacity |
| M1 – M4 | Macro knobs |
| X / Y | Transform position |
| Sc | Transform scale |
| ° | Transform rotation |
| FX params | Float parameters exposed by the active effect |
XY destinations expose X1, Y1, X2, Y2.
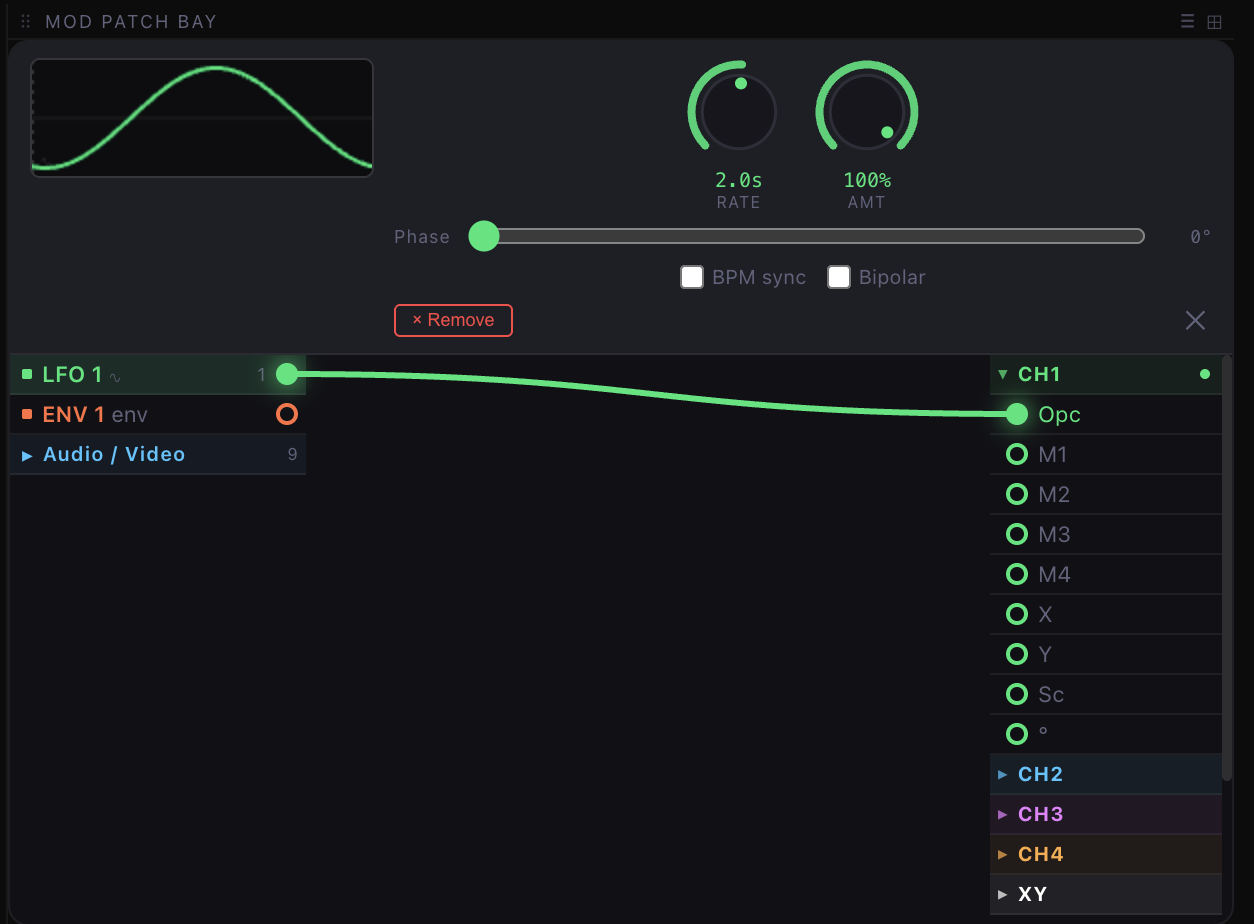
LFO Editor
Clicking an LFO label opens its inline editor at the top of the panel.
| Control | Function |
|---|---|
| Waveform scope | Animated display showing the LFO's current waveform with a moving phase cursor. |
| RATE knob | Sets the speed in seconds per cycle. Double-click to type a precise value. |
| AMT knob | Sets output amplitude — scales all routes from this LFO simultaneously. |
| Phase slider | Offsets the starting phase (0°–360°) to stagger LFOs of the same rate. |
| BPM Sync | Locks the LFO to a musical division of the global tempo (4 bars down to 1/8). |
| Bipolar | When checked, the LFO swings −1 to +1. When unchecked, 0 to 1. |
| × Remove | Deletes this LFO and all of its active cables. |
Drawing a Connection
- Hover over a source row — the circular node becomes visible
- Click and drag from the node toward a destination
- Release over the target parameter to complete the cable
- The depth set by the DEPTH slider is applied automatically
Multiple sources can be routed to the same destination — their values are summed. A single source can fan out to multiple destinations simultaneously.
FX Params
The FX Params panel exposes the detailed parameter controls for whatever source and effects are assigned to each channel. It consolidates source-level settings, effect slot 1 parameters, and effect slot 2 parameters into a single scrollable view per channel.
Channel Tabs
Tabs 1 through 8 correspond to the 8 channels. The active channel is highlighted in green. Switching tabs instantly shows that channel's parameters.
Effect Chain Breadcrumb
Below the tabs, a breadcrumb shows the current effect chain for the selected channel:
Mirror → Kaleidoscope
This means FX slot 1 is Mirror and FX slot 2 is Kaleidoscope. Parameters for both effects appear below.
SOURCE PARAMS
| Parameter | Description |
|---|---|
| Color | A color picker for sources that use a primary color value. Click the swatch to open the full picker. |
| Shape | A dropdown for sources with selectable geometry — Dots, Ring, Line, and others depending on the active generator. |
| Sprite | Loads a custom image file as a sprite element into the source. Click Load to browse. |
EFFECT PARAMS — FX Slot 1 & 2
Each effect exposes its own unique set of parameters. As an example, Kaleidoscope exposes:
| Parameter | Description |
|---|---|
| Segments | Number of repeating wedge segments. Higher values create denser patterns. |
| Zoom | Scales the source before the kaleidoscope fold. |
| Rotation | Rotates the entire pattern in real time. Assign an LFO for continuous auto-rotation. |
The available effects include chromatic aberration, glitch, pixelate, kaleidoscope, mirror, zoom-rotate, ASCII art, dither, and more.
XY Pad
The XY Pad provides two independent two-axis performance controllers — XY 1 and XY 2 — displayed side by side. Each pad broadcasts its X and Y coordinates as modulation signals in real time.
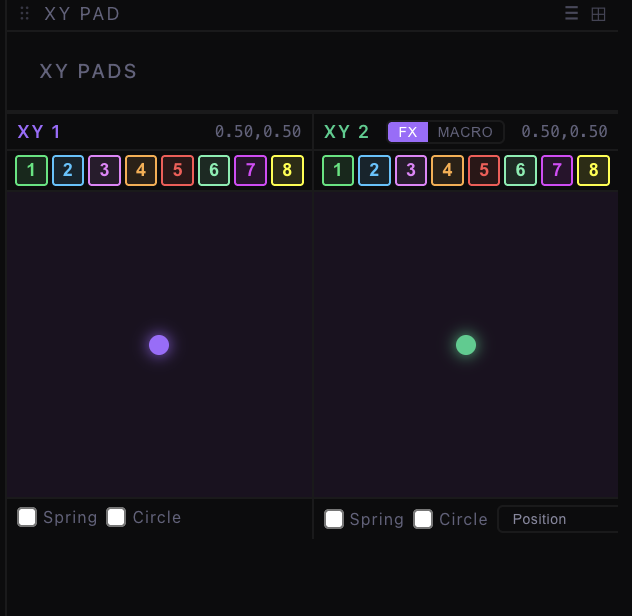
XY 1
The left pad. Its X and Y values are always routed to the global macro blend — moving the dot simultaneously blends M1/M2 (X axis) and M3/M4 (Y axis) across all active channels at once. Values range from 0.0 to 1.0 and are displayed numerically in the pad header.
| Physics Option | Effect |
|---|---|
| Spring | The dot snaps back to center when released. |
| Circle | Constrains movement to a circular boundary. |
XY 2
The right pad. XY 2 has an additional FX / MACRO toggle that changes its operating mode.
In MACRO mode it behaves identically to XY 1. In FX mode it applies a global post-process effect to the entire composited output:
| Effect | X Axis | Y Axis |
|---|---|---|
| Position | Horizontal offset of the full output | Vertical offset |
| Zoom + Rotate | Zoom level (1× to 4×) | Rotation (−180° to +180°) |
| Color Grade | Hue rotation | Saturation |
| Chroma | Chromatic aberration amount | Barrel distortion + vignette |
Performance Tips
- Spring + FX mode — push Chroma hard for a burst effect, release, and it springs back automatically.
- Both pads together — run independent macro morphs on XY 1 while driving a global zoom on XY 2 simultaneously.
- All four axes (X1, Y1, X2, Y2) are available as Mod Matrix destinations for hands-free automation.
Shader Editor
The Shader Editor is SMERGE's built-in GLSL code environment. Write, edit, compile, and assign custom fragment shaders as visual sources — directly inside the application with no external tools required. Open it from the Shader button in the title bar.
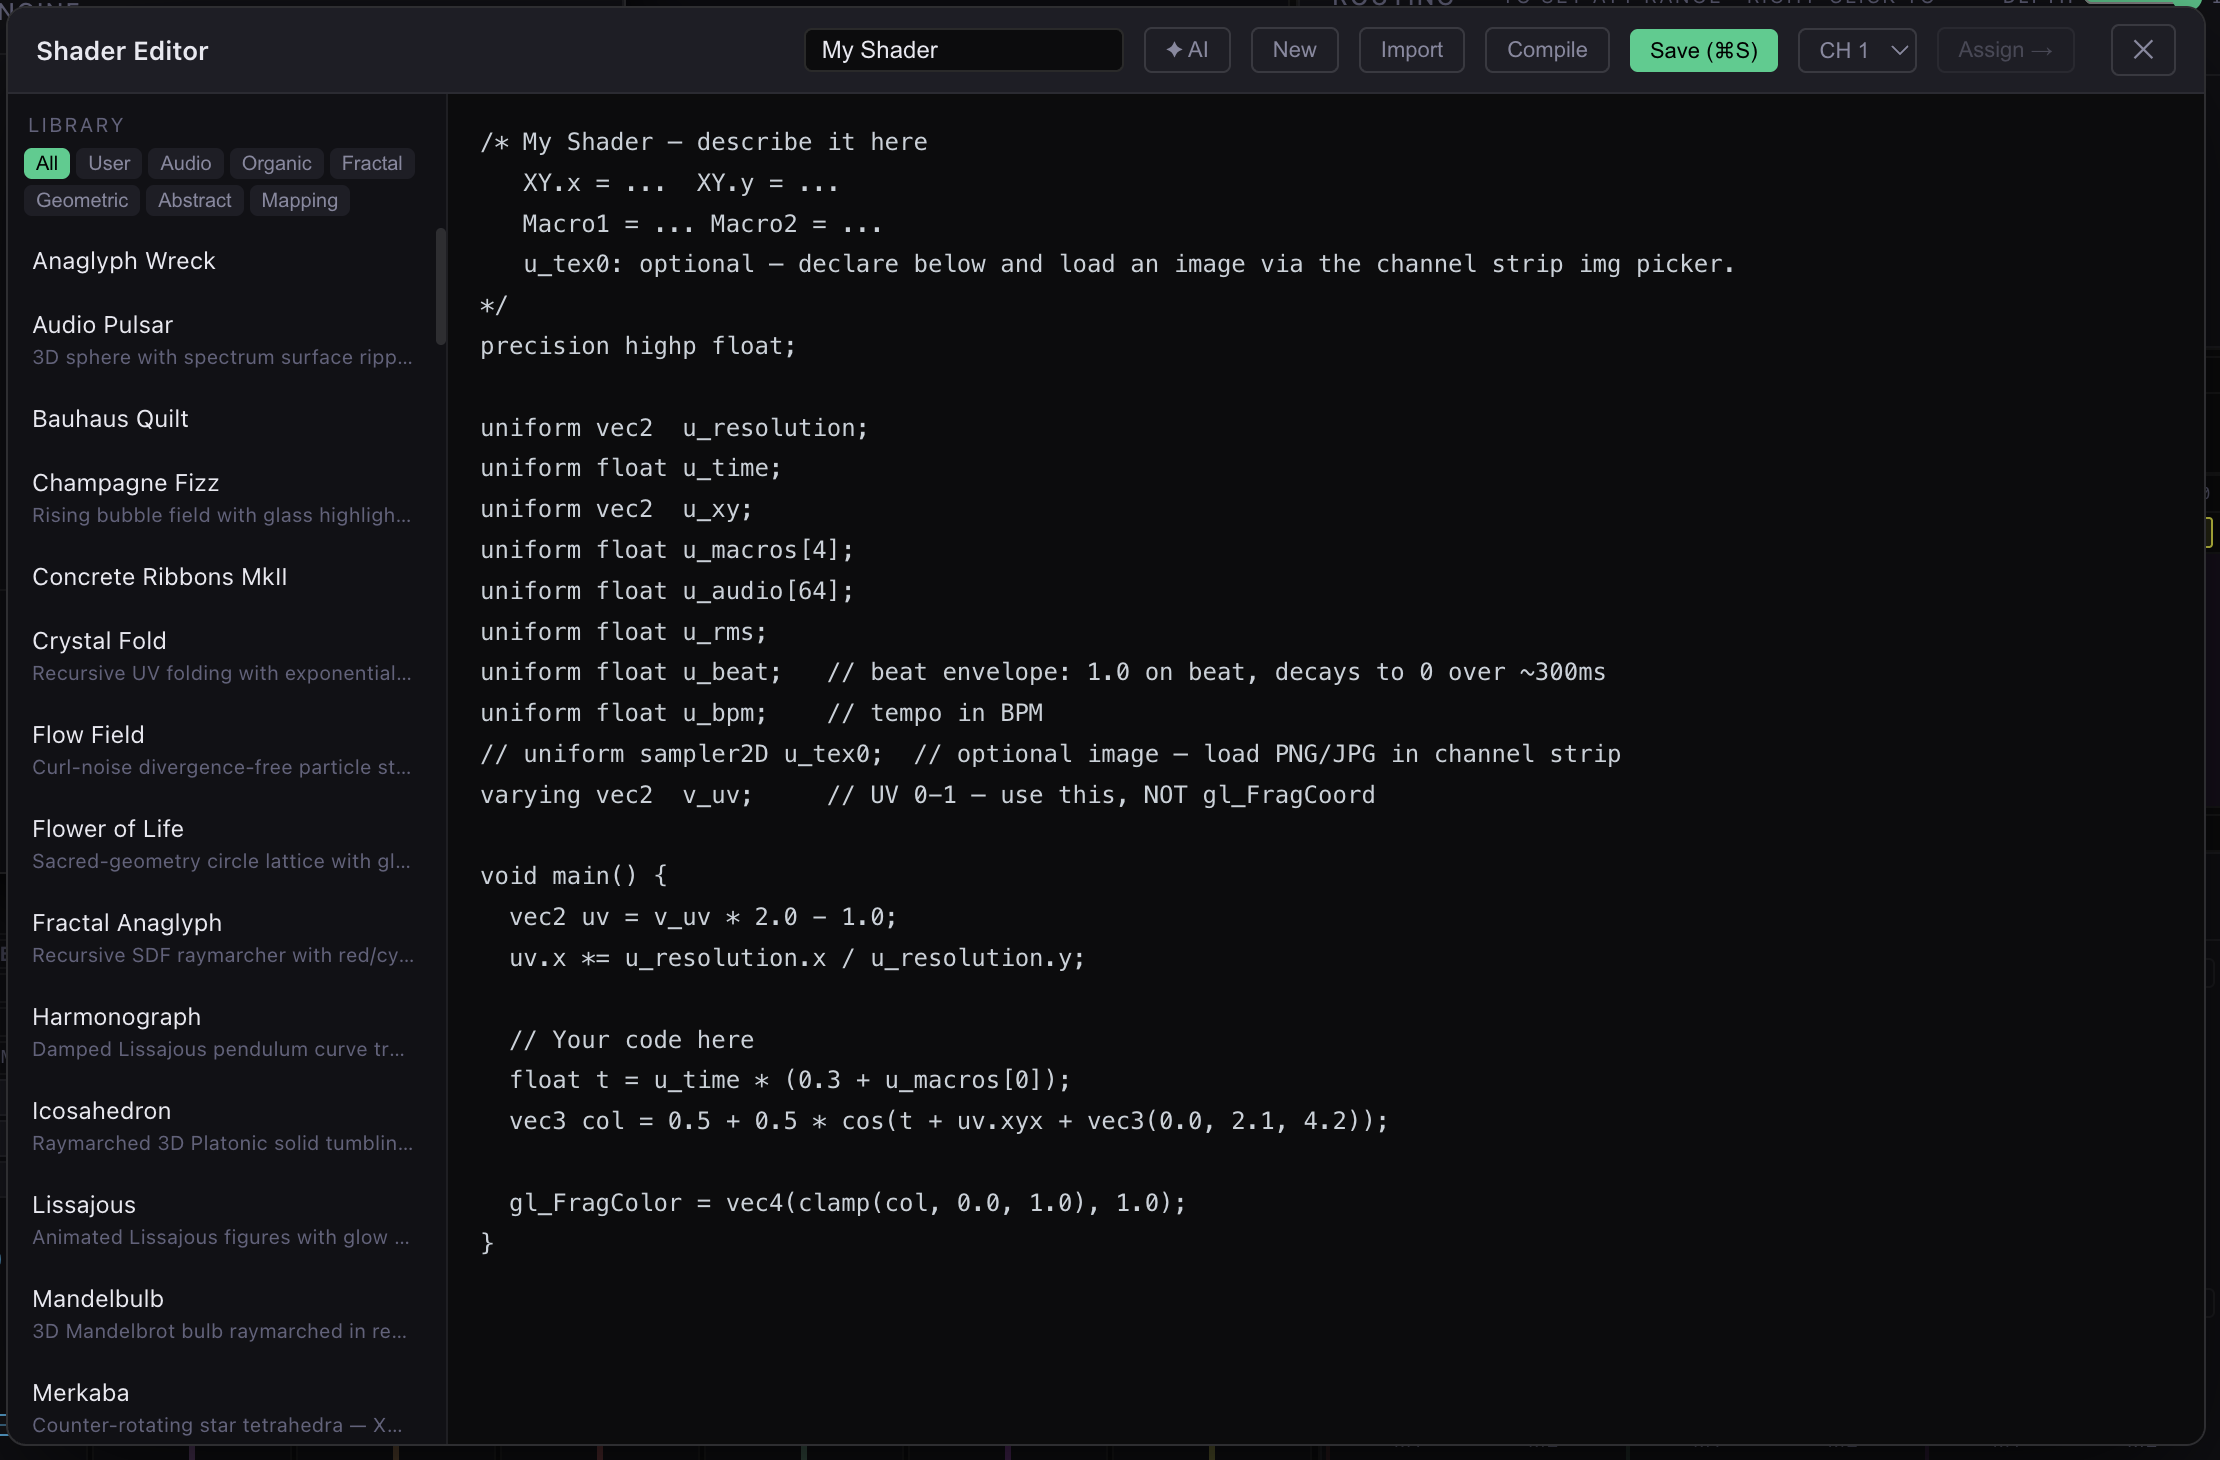
Header Controls
| Control | Function |
|---|---|
| Name field | The name of the shader as it appears in the source picker. |
| New | Creates a blank shader with the standard uniform template pre-filled. |
| Compile | Compiles the current code. Preview updates immediately on success. Errors appear in a bar below the editor — click ✕ to dismiss. Large error logs scroll within the bar so they never bury your code. |
| Save ⌘S | Saves the shader to your library. |
| CH 1 ▾ | Channel selector — assigns the shader to the chosen channel after saving. |
| Assign → | Pushes the current shader to the selected channel. |
| ✕ | Closes the Shader Editor. |
Shader Type
A row of pills below the header (labeled TYPE) switches which kind of shader you're writing. Each type has its own language and uniform conventions, and the Library panel's contents update to match whichever type is selected:
| Type | What it is |
|---|---|
| GLSL | Raw fragment shaders using SMERGE's own u_-prefixed uniforms. The default type, and the fastest to compile and run. |
| ISF | Interoperable Shader Format — a JSON header plus GLSL body, compatible with the wider VJ shader ecosystem. |
| Three.js | Full JavaScript 3D scenes using the Three.js API. |
| Shadertoy | Single-pass shaders written in Shadertoy.com's own convention (mainImage(), iTime, iResolution, etc.) — paste code from shadertoy.com directly. See Shadertoy Shaders below. |
| Shadertoy MB | Multi-buffer Shadertoy shaders — up to four persistent feedback buffers (Buffer A–D) plus a final Image pass, for simulations like Game of Life, reaction-diffusion, and fluid advection. See Multi-Buffer Shadertoy Shaders below. |
Library Panel
Lists all available shaders organized by category:
| Tag | Content |
|---|---|
| All | Every shader |
| Abstract | Non-representational color and pattern fields |
| Space | Nebulae, galaxies, tunnels, cosmic imagery |
| Fractal | Mathematical recursive structures |
| Geometric | SDF shapes, grids, tiled forms |
| Organic | Fluid, biological, and natural forms |
| Audio | Waveforms, oscilloscopes, spectrum visualizers |
| Mask | Black-and-white utility shaders for compositing |
Click any shader to load its source into the editor. Built-in generators are read-only references — editing creates a new copy in your personal library.
Standard Uniforms
Every shader in SMERGE receives these uniforms automatically each frame:
uniform vec2  u_resolution;   // output canvas size in pixels
uniform float u_time;         // elapsed time in seconds
uniform vec2  u_xy;           // XY Pad 1 position (0.0–1.0)
uniform float u_macros[4];    // M1–M4 macro knob values (0.0–1.0)
uniform float u_audio[64];    // FFT frequency bins (0.0–1.0 per bin)
uniform float u_rms;          // overall audio loudness (0.0–1.0)
uniform float u_beat;         // audio beat envelope: 1.0 on transient, decays to 0 over ~300ms
uniform float u_bpm;          // current BPM (e.g. 128.0)
uniform sampler2D u_waveformTex; // stereo scope waveform, 512×1: R=Left, G=Right (decode ×2−1)
varying vec2  v_uv;           // interpolated UV coordinates (0.0–1.0)
Standard Shader Structure
precision highp float;

void main() {
    // Convert UV to centered, aspect-corrected coordinates
    vec2 uv = v_uv * 2.0 - 1.0;
    uv.x *= u_resolution.x / u_resolution.y;

    // Your visual logic here

    gl_FragColor = vec4(color, 1.0);
}
Writing Audio-Reactive Shaders
The u_audio[64] array contains the live FFT spectrum from sub-bass (index 0) to high frequencies (index 63):
float bass   = u_audio[2];    // low-end energy
float treble = u_audio[50];   // high-frequency energy
float level  = u_rms;         // overall loudness
float beat   = u_beat;        // 1.0 on kick/snare, smoothly decays to 0

// Interpolate across all 64 bands — useful for spectrum visualizers:
float spectrum(float p) {
    float x = clamp(p * 63.0, 0.0, 63.0);
    int   i = int(x);
    return mix(u_audio[i], u_audio[i + 1], fract(x));
}
The Audio Waveform — u_waveformTex
While u_audio[64] is the frequency spectrum, u_waveformTex is the actual time-domain waveform — the raw audio samples — which is what a real oscilloscope draws. It is a 512×1 texture where the red channel is the Left sample and the green channel is the Right, each stored 0–1 (decode with ×2−1 to get −1..1):
vec2 wave(float t) {              // t = 0..1 across the buffer
  return texture(u_waveformTex, vec2(t, 0.5)).rg * 2.0 - 1.0;  // .r = Left, .g = Right
}
Plot wave(uv.x).x against the vertical axis for a classic scope trace, or use (Left, Right) as X/Y for a Lissajous "oscilloscope music" figure. The built-in True Scope generator (Sources → Generators, Audio category) does exactly this — M1 switches between scope-trace and Lissajous, M2 is gain, M3 glow, M4 hue. The waveform is captured from a stereo tap on the audio, so it works with any playing source — music, microphone, or per-app capture.
✦ AI Shader Generator
The Shader Editor includes a built-in AI code generator. Click the ✦ AI button in the top-right corner of the Shader Editor to open the AI panel. Type a description of the visual you want and press Generate — the model streams GLSL code directly into the editor in real time, which you can then compile, tweak, and save.
See Chapter 15 — AI Shader Generator for full setup instructions, provider options, and prompting tips.
Tips
- Compile often — errors point to the exact line number.
- Use macros liberally — every
u_macros[0–3]is automatable via the Mod Matrix. Design shaders so M1–M4 produce musically interesting changes. - Start from a built-in — load any generator as a starting point, modify it, and save under a new name.
- Saved shaders persist — your shaders survive app updates and appear in the Generators section across all sessions.
Shadertoy Shaders
SMERGE can run single-pass shaders written in Shadertoy.com's convention directly — paste code from shadertoy.com into the editor with TYPE → Shadertoy selected and it runs largely unmodified.
| Uniform | Meaning |
|---|---|
iTime | Elapsed seconds (equivalent to SMERGE's u_time) |
iResolution | vec3 — canvas size in pixels, z always 1.0 |
iMouse | vec4 — driven by the XY Pad instead of a real mouse |
iFrame | Elapsed-time-based frame approximation for single-pass shaders |
iTimeDelta, iDate, iSampleRate | Standard Shadertoy constants/stubs |
iChannel0–iChannel3 | All four alias to the same single image slot in single-pass mode — assign it via the channel strip's image picker. (Multi-buffer mode below gives each channel a real, independent source.) |
SMERGE's own extensions are also available inside Shadertoy-type shaders: u_beat, u_rms, u_bpm, u_audio[64], u_macros[4], u_xy — the same signals described in the Shader Artist Reference below.
Multi-Buffer Shadertoy Shaders
Select TYPE → Shadertoy MB for shaders that need persistent state across frames — cellular automata (Conway's Game of Life), reaction-diffusion growth, fluid simulation, feedback/bloom pipelines, and anything else that reads its own previous output. A multi-buffer shader is up to four render-to-texture buffers (named A–D) plus a mandatory final Image pass that composites them into what's displayed.

The Tabbed Editor
Each pass gets its own tab — Common, Buf A through Buf D (only tabs for buffers that exist are shown), and Image — so you write and read one pass's mainImage() at a time instead of hand-editing one large JSON file.
| Control | Function |
|---|---|
| Common | GLSL shared by every pass — helper functions, constants. Has no channels of its own. |
| Buf A–D | One tab per persistent buffer. Each is a complete mainImage() — it doesn't need to look good on its own, since it's read by another pass, not displayed directly. |
| Image | The mandatory final pass — its output is what actually appears on the channel. |
| + Buffer | Adds a new buffer (up to 4 total) with a blank starting template. |
| ✕ Remove | Deletes the currently selected buffer. Any other pass that referenced it is automatically rewired to stop reading it, rather than left pointing at a buffer that no longer exists. |
| Raw JSON | Drops into the underlying JSON bundle directly — useful for pasting a shader from elsewhere, or hand-editing something the tab view doesn't expose. Tabs view switches back. |
Channel Wiring
Above the code editor, a Channels row lists this pass's iChannelN inputs. Each one is wired to either a buffer (reading that buffer's own previous frame for self-feedback, or another buffer's previous frame to chain multi-stage simulations) or a texture slot (a static image you assign — see below). Use + channel to wire up a new one (up to 4 per pass) and ✕ on a channel chip to remove it. Buffer passes also get a Res control — 100/75/50/25% — to run an expensive simulation buffer at a lower resolution than the final output.
Image Slots — Using Your Own Images
A texture-wired channel reads one of four named slots (img0–img3) instead of a buffer. Assign the actual image via the channel strip or channel pop-out panel — SMERGE shows one small picker per slot the shader's channels actually use, labeled with which pass(es) read it (e.g. "Buf A ch1, Image ch2"), plus a clamp/repeat wrap toggle for tiling textures like noise patterns. Two channels wired to the same slot name — even across different passes — always show the identical image.
Importing Multi-Buffer Shaders
Use Import in the Shader Editor toolbar (or the source picker's + Import file…) and choose a .json file exported from shadertoy.com. SMERGE converts it automatically — buffer/image passes and their exact channel wiring carry over, up to 4 buffers. Sound passes, cubemap passes, and keyboard/webcam/video channel inputs aren't supported and are reported by name if the import can't proceed; static texture channels import as empty (assign the image yourself afterward, since Shadertoy's asset CDN isn't reachable from inside SMERGE).
AI Generation for Multi-Buffer Shaders
Click ✦ AI with Shadertoy MB selected and describe the technique in plain language — "Conway's Game of Life reseeded on the beat" or "Gray-Scott reaction-diffusion coral growth." Generation happens as a short planning step (deciding how many buffers the technique needs and how they're wired) followed by one focused call per pass, so even a multi-buffer shader completes reliably instead of running out of output budget partway through. The progress indicator shows each step as it happens; the finished bundle loads straight into the tabbed editor above. See Chapter 15 — AI Shader Generator for setup and general prompting guidance.
Shader Artist Reference
This reference covers every signal, uniform, and API surface available to GLSL, ISF, Three.js, Shadertoy, and Shadertoy MB generators. All share the same audio analysis, macro knobs, and modulation routing — only the language and API surface differs.
1 — Signal Flow
Live Audio ──► FFT Analyzer (64 bands) ──► u_audio[64]
                                       ──► u_rms, u_beat, u_bpm
                                       ──► Mod Matrix

Macro Knobs (M1–M4) ─┐
Mod Matrix outputs  ──┴──► u_macros[0–3]
XY Pad ──────────────────────────────────► u_xy
Every frame Smerge resolves each macro's final value as:
u_macros[i] = clamp(knob_value + sum(all_active_modulators_on_slot_i), 0, 1)
A shader only ever reads u_macros[i] — it never needs to know whether the current value came from a knob turn, a beat envelope, an LFO, or a MIDI CC. Design parameters to be expressive across the full 0–1 range and the modulation system does the rest.
2 — Shared Audio & Control Reference
u_audio[64] — 64 FFT bands, 0.0–1.0 (normalized against recent peak):
| Index range | Frequency range | Musical content |
|---|---|---|
[0]–[3] | 20–60 Hz | Sub-bass, kick fundamental, sub synths |
[4]–[7] | 60–120 Hz | Kick body, bass guitar, bass synths |
[8]–[15] | 120–500 Hz | Lower harmonics, bass presence, warm midrange |
[16]–[31] | 500 Hz–4 kHz | Vocals, snare, piano, synth leads |
[32]–[47] | 4–10 kHz | Upper harmonics, guitar bite, hi-hat body |
[48]–[55] | 10–14 kHz | Cymbal shimmer, hi-hat attack |
[56]–[63] | 14–20 kHz | Air, transient snap, very high harmonics |
Practical named bands for clarity in your shaders:
// GLSL / ISF
float sub  = u_audio[2];    // sub-bass — deep rumble
float bass = u_audio[4];    // kick / bass guitar fundamental
float mid  = u_audio[20];   // vocal / snare presence
float hi   = u_audio[52];   // cymbal shimmer
float air  = u_audio[60];   // top-end sizzle

// Three.js update(ctx)
const sub  = audio[2];
const bass = audio[4];
const mid  = audio[20];
const hi   = audio[52];
const air  = audio[60];
u_beat — 1.0 exactly on the detected beat, decays exponentially to 0.0 over ~300 ms. u_bpm holds the current tempo in BPM.
// Flash geometry on beat
col *= 1.0 + u_beat * 0.6;

// BPM-synced pulsing — one full cycle per beat
float beatPhase = fract(u_time * u_bpm / 60.0);
float pulse = 0.5 - 0.5 * cos(beatPhase * 6.28318);
u_rms — overall loudness 0.0–1.0, smoothed. Moves slower than individual bands. Use for global brightness, scale, or fog density.
u_macros[0–3] — M1–M4, each 0.0–1.0. Values already incorporate all assigned modulations. Comment every macro at the top of your shader:
// M1 = symmetry order   M2 = fly speed   M3 = color palette   M4 = glow width

float sym   = floor(3.0 + u_macros[0] * 5.0);
float speed = 0.2 + u_macros[1] * 2.8;
float hue   = u_macros[2];
float glow  = 0.005 + u_macros[3] * 0.05;
u_xy — XY Pad, vec2 (0.0–1.0 each axis, default 0.5). u_time — elapsed seconds. u_resolution — canvas size in pixels as vec2.
3 — GLSL Shader Spec
Every GLSL shader must begin with this exact header — #version 300 es must be the absolute first line with no blank lines or comments before it:
#version 300 es
precision highp float;

uniform vec2  u_resolution;
uniform float u_time;
uniform vec2  u_xy;
uniform float u_macros[4];
uniform float u_audio[64];
uniform float u_rms;
uniform float u_beat;
uniform float u_bpm;
in vec2 v_uv;

out vec4 fragColor;
Coordinate system:
vec2 uv = v_uv * 2.0 - 1.0;
uv.x *= u_resolution.x / u_resolution.y;
// uv is now (-ar, -1) to (+ar, +1) with (0,0) at canvas center
Optional texture sampler — declare only if using an image loaded via the channel strip image picker:
uniform sampler2D u_tex0;
vec4 tex = texture(u_tex0, v_uv);
Spectrum helper & audio patterns:
// Interpolated spectrum lookup — idx 0.0→1.0 maps to bands 0→63
float spectrum(float idx) {
  float fi = clamp(idx, 0.0, 1.0) * 63.0;
  float v  = 0.0;
  for (int i = 0; i < 64; i++) {
    float w = 1.0 - clamp(abs(float(i) - fi), 0.0, 1.0);
    v += u_audio[i] * w;
  }
  return v;
}

// Per-column bar (spectrum visualizer)
int band   = clamp(int(v_uv.x * 64.0), 0, 63);
float energy = u_audio[band];   // dynamic index is valid in ES 3.0

// BPM-synced warp
float phase = fract(u_time * u_bpm / 60.0);
float warp  = sin(phase * 6.28318) * bass * 0.3;
uv += normalize(uv) * warp;
Macro patterns:
// Discrete steps
float folds = floor(2.0 + u_macros[0] * 6.0);    // 2, 3, 4, 5, 6, 7, 8

// Exponential range (perceptually linear)
float speed = exp(u_macros[1] * 4.0 - 2.0);       // 0.14× to 7.4×

// Binary toggle at center
if (u_macros[2] > 0.5) { /* mirror mode on */ }

// Cross-fade between behaviours
vec3 col = mix(colA, colB, u_macros[3]);
Output — never use gl_FragColor in GLSL ES 3.0:
fragColor = vec4(clamp(col, 0.0, 1.0), 1.0);
ES 3.0 feature highlights:
| Feature | ES 1.0 (old) | ES 3.0 (current) |
|---|---|---|
| Fragment output | gl_FragColor | out vec4 fragColor |
| Fragment input | varying vec2 v_uv | in vec2 v_uv |
| Texture sampling | texture2D(s, uv) | texture(s, uv) |
| Dynamic array index | Not allowed | u_audio[i] in loops ✓ |
| Bitwise ops | No | int n = a & b; ✓ |
4 — ISF Shader Spec
ISF (Interactive Shader Format) is an industry-standard GLSL wrapper used by Resolume, VDMX, and other VJ tools. Smerge's ISF preprocessor strips the JSON header and injects its own uniform block so ISF shaders run natively. Only single-pass shaders are supported.
File structure:
/*{
  "DESCRIPTION": "One-sentence description shown in the library",
  "INPUTS": [
    {"NAME": "macro1Name", "TYPE": "float", "DEFAULT": 0.5, "MIN": 0.0, "MAX": 1.0},
    {"NAME": "macro2Name", "TYPE": "float", "DEFAULT": 0.0, "MIN": 0.0, "MAX": 1.0},
    {"NAME": "macro3Name", "TYPE": "float", "DEFAULT": 0.5, "MIN": 0.0, "MAX": 1.0},
    {"NAME": "macro4Name", "TYPE": "float", "DEFAULT": 1.0, "MIN": 0.0, "MAX": 1.0}
  ]
}*/

void main() {
  // your code here — up to 4 float INPUTS map to u_macros[0–3] in order
  gl_FragColor = vec4(color, 1.0);
}
ISF ↔ Smerge compatibility defines (injected automatically):
| ISF name | Smerge equivalent |
|---|---|
isf_FragNormCoord | v_uv (0–1 UV) |
TIME | u_time |
RENDERSIZE | u_resolution |
PASSINDEX | 0 (always single pass) |
All Smerge uniforms (u_audio[64], u_rms, u_beat, u_bpm, u_xy, u_macros[0–3]) are also available in every ISF shader. Output uses gl_FragColor as in standard ISF — the preprocessor converts it to fragColor automatically.
5 — Three.js Scene Spec
Three.js generators run JavaScript and build a full 3D scene using the Three.js r163 API. Export setup and update as plain function declarations:
let mesh, light   // shared between setup and update

function setup(ctx) {
  const { THREE, scene, camera, renderer } = ctx
  // Build your scene here — runs once on init
}

function update(ctx) {
  if (!mesh) return   // always guard against partial setup failure
  const { clock, beat, rms, macros, audio } = ctx
  // Animate your scene — runs every frame (~60 fps)
}
setup(ctx) properties:
| Property | Type | Description |
|---|---|---|
ctx.THREE | Object | The Three.js namespace |
ctx.scene | THREE.Scene | Root scene — add all objects here |
ctx.camera | THREE.PerspectiveCamera | Default 50° FOV perspective camera |
ctx.renderer | THREE.WebGLRenderer | WebGL renderer — use for setClearColor, setPixelRatio, etc. |
update(ctx) properties:
| Property | Type | Description |
|---|---|---|
ctx.clock | THREE.Clock | Use clock.getElapsedTime() for continuous animation |
ctx.beat | number | Beat envelope, 1.0 on beat → 0.0 over ~300 ms |
ctx.rms | number | Overall loudness, 0.0–1.0 |
ctx.xy | [number, number] | XY pad, each axis 0.0–1.0 (default 0.5) |
ctx.macros | Float32Array(4) | M1–M4, each 0.0–1.0 |
ctx.audio | Float32Array(64) | FFT bands 0–63, each 0.0–1.0 |
Camera setup:
function setup(ctx) {
  const { camera } = ctx
  camera.position.set(0, 2, 5)
  camera.lookAt(0, 0, 0)
  // To override FOV:
  camera.fov = 70
  camera.updateProjectionMatrix()
}
Audio reactivity & macro patterns:
function update(ctx) {
  const { clock, beat, rms, macros, audio } = ctx
  const t = clock.getElapsedTime()

  const bass = audio[4]  ?? 0
  const mid  = audio[20] ?? 0
  const hi   = audio[52] ?? 0

  // Scale + rotate on beat
  mesh.scale.setScalar(1 + rms * 0.3 + beat * 0.4)
  mesh.rotation.y = t * 0.3 + beat * 0.8

  // Color cycle through hue
  light.color.setHSL((t * 0.05 + macros[2]) % 1.0, 1.0, 0.5)
  light.intensity = 2 + bass * 8 + beat * 6

  // Binary toggle at midpoint
  mesh.material.wireframe = macros[3] > 0.5
}
XY orbit pattern:
const azimuth   = (xy[0] - 0.5) * Math.PI * 2
const elevation = (xy[1] - 0.5) * Math.PI
camera.position.x = Math.cos(elevation) * Math.sin(azimuth) * 4
camera.position.y = Math.sin(elevation) * 4
camera.position.z = Math.cos(elevation) * Math.cos(azimuth) * 4
camera.lookAt(0, 0, 0)
setup() throws partway through, shared variables remain undefined. Without a guard, update() throws 60× per second. Start every update() with if (!mesh || !light) return.6 — Shadertoy Spec
Shadertoy-type shaders write a single mainImage() function using Shadertoy.com's own uniform names — no #version, precision statement, or standard uniform declarations needed; SMERGE injects them automatically:
void mainImage(out vec4 fragColor, in vec2 fragCoord) {
    vec2 uv = fragCoord / iResolution.xy;

    // Your visual logic here

    fragColor = vec4(col, 1.0);
}
| Uniform | Type | Notes |
|---|---|---|
iTime | float | Elapsed seconds |
iTimeDelta | float | Fixed at 1/60 |
iResolution | vec3 | Canvas size in pixels, z = 1.0 |
iMouse | vec4 | Driven by XY Pad position × resolution |
iFrame | int | Elapsed-time approximation (single-pass has no persistent buffer to count real frames from) |
iDate | vec4 | Stubbed to zero |
iSampleRate | float | Stubbed to 44100.0 |
iChannel0–iChannel3 | sampler2D | All four alias one shared image slot — assign via the channel strip |
SMERGE's audio/macro extensions are available alongside the standard set: u_beat, u_rms, u_bpm, u_audio[64], u_macros[4], u_xy — identical meaning to the GLSL/ISF/Three.js versions described in §2 above.
7 — Shadertoy MB (Multi-Buffer) Spec
A multi-buffer bundle is JSON: a common string, a buffers object with keys A–D (each null or a pass), and a mandatory image pass. The tabbed editor described above reads and writes this same structure — you rarely need to touch the JSON directly.
{
  "version": 1,
  "common": "",
  "buffers": {
    "A": {
      "code": "void mainImage(out vec4 fragColor, in vec2 fragCoord) { ... }",
      "inputs": [ { "channel": 0, "type": "buffer", "ref": "A" } ],
      "resolutionScale": 1.0
    },
    "B": null, "C": null, "D": null
  },
  "image": {
    "code": "void mainImage(out vec4 fragColor, in vec2 fragCoord) { ... }",
    "inputs": [ { "channel": 0, "type": "buffer", "ref": "A" } ]
  }
}
Every pass writes a standard mainImage() — the same signature as single-pass Shadertoy — but each declared channel is a real, independent input rather than an alias to one shared slot:
| Input type | ref | Reads |
|---|---|---|
"buffer" | "A"–"D" | That buffer's own output from the end of the previous frame. A buffer referencing its own letter is self-feedback. |
"texture" | "img0"–"img3" | A user-assigned static image slot (see Image Slots above) — black until assigned. |
Buffers execute in a fixed order every frame — A → B → C → D → Image — and every buffer-type channel always reads the referenced buffer's state from the end of the previous frame, so pass order within a single frame never needs to be reasoned about.
iFrame behaves differently here than in single-pass mode: for a Buffer A–D pass it's a real per-buffer frame count, starting at 0 the first time that buffer ever renders. Test iFrame < 1 to seed a buffer's initial state — random soup for cellular automata, an initial density field for a simulation — rather than relying on a beat/audio trigger to eventually populate it. The Image pass has no buffer of its own, so its iFrame remains only an elapsed-time approximation, as in single-pass mode.
8 — Macro Design Guidelines
Macros are the primary performance interface — treat them as instrument controls.
| Macro | Suggested role | Modulation targets |
|---|---|---|
| M1 | Primary form / structure | LFO → pulsing geometry, beat-sync |
| M2 | Speed / time rate | Envelope → accelerate on beat |
| M3 | Color / palette | MIDI CC → tonal control |
| M4 | Texture / detail | Audio band → high-freq detail |
Range design rule:
- 0.0 = safe default (nothing broken or invisible)
- 0.5 = balanced neutral (good starting point for performance)
- 1.0 = maximum expression (may be extreme, but never broken)
The Mod Matrix can assign LFOs, beat envelopes, audio bands, and MIDI CCs to any macro — all additive and clamped. Because modulations push values above 0.5, design your shader so the upper half of every macro range is already interesting territory.
9 — Cross-Type Comparison
| Feature | GLSL | ISF | Three.js |
|---|---|---|---|
| Language | GLSL ES 3.0 | GLSL ES 3.0 (via preprocessor) | JavaScript (ES2022) |
| Macros | u_macros[0–3] | u_macros[0–3] (from INPUTS) | macros[0–3] Float32Array |
| Audio | u_audio[64] | u_audio[64] | audio[64] Float32Array |
| Beat | u_beat | u_beat | beat number |
| RMS | u_rms | u_rms | rms number |
| XY | u_xy vec2 | u_xy vec2 | xy[2] array |
| Time | u_time | TIME (or u_time) | clock.getElapsedTime() |
| UV coords | v_uv (in) | isf_FragNormCoord | camera + projection |
| Texture input | u_tex0 sampler | not supported | THREE.TextureLoader |
| Output variable | fragColor | gl_FragColor (auto-converted) | renderer target |
| GPU cost | lowest | low | medium–high |
Shadertoy and Shadertoy MB aren't in the table above because they use Shadertoy's own naming instead of SMERGE's u_-prefixed convention — iTime not u_time, mainImage() not main(), and so on. See §6 and §7 above for their full uniform reference. SMERGE's audio/macro/XY extensions (u_beat, u_rms, u_bpm, u_audio[64], u_macros[4], u_xy) are identical across all five types.
10 — Performance Tips
GLSL / ISF
- Each shader runs once per pixel per frame — ~2M+ invocations at 1080p60.
- Avoid
if/elsebranches inside tight loops — prefermix()andstep(). - Raymarching: keep iterations under 96 and exit early with
breakwhend < 0.001. - Dynamic array indexing (
u_audio[i]in loops) is valid in ES 3.0 — use it freely. discardkills the pixel early but disrupts GPU parallelism — use sparingly.
Three.js
- Create geometries and materials only in
setup()— never allocate inupdate(). InstancedMeshwithsetMatrixAt/setColorAtscales to thousands of objects.- Set
mesh.instanceMatrix.setUsage(THREE.DynamicDrawUsage)if updating every frame. - Call
mesh.instanceMatrix.needsUpdate = trueafter every frame'ssetMatrixAtcalls. - Limit to 1–2 active Three.js layers — each one opens a separate WebGL context.
11 — Quick-Start Templates
GLSL:
#version 300 es
precision highp float;

uniform vec2  u_resolution;
uniform float u_time;
uniform vec2  u_xy;
uniform float u_macros[4];
uniform float u_audio[64];
uniform float u_rms;
uniform float u_beat;
uniform float u_bpm;
in vec2 v_uv;

out vec4 fragColor;

// M1 = scale  M2 = speed  M3 = color hue  M4 = glow

void main() {
  vec2 uv = v_uv * 2.0 - 1.0;
  uv.x *= u_resolution.x / u_resolution.y;

  float scale = 1.0 + u_macros[0] * 6.0;
  float speed = 0.2 + u_macros[1] * 2.0;
  float bass  = u_audio[4];
  float t     = u_time * speed;

  float r = length(uv * scale) + bass * 0.5;
  float v = 0.5 + 0.5 * sin(r * 4.0 - t + u_beat * 3.14159);

  vec3 col = 0.5 + 0.5 * cos(6.28318 * (u_macros[2] + v + vec3(0.0, 0.33, 0.67)));
  col *= 0.7 + u_rms * 0.6 + u_beat * 0.4;

  fragColor = vec4(clamp(col, 0.0, 1.0), 1.0);
}
ISF:
/*{
  "DESCRIPTION": "My ISF shader — describe it here",
  "INPUTS": [
    {"NAME": "scale",  "TYPE": "float", "DEFAULT": 0.5, "MIN": 0.0, "MAX": 1.0},
    {"NAME": "speed",  "TYPE": "float", "DEFAULT": 0.4, "MIN": 0.0, "MAX": 1.0},
    {"NAME": "hue",    "TYPE": "float", "DEFAULT": 0.0, "MIN": 0.0, "MAX": 1.0},
    {"NAME": "glow",   "TYPE": "float", "DEFAULT": 0.5, "MIN": 0.0, "MAX": 1.0}
  ]
}*/

void main() {
  vec2 uv = isf_FragNormCoord * 2.0 - 1.0;
  uv.x *= RENDERSIZE.x / RENDERSIZE.y;

  float sc   = 1.0 + u_macros[0] * 6.0;
  float spd  = 0.2 + u_macros[1] * 2.0;
  float bass = u_audio[4];

  float r = length(uv * sc) + bass * 0.5;
  float v = 0.5 + 0.5 * sin(r * 4.0 - TIME * spd + u_beat * 3.14159);

  vec3 col = 0.5 + 0.5 * cos(6.28318 * (u_macros[2] + v + vec3(0.0, 0.33, 0.67)));
  col *= 0.7 + u_rms * 0.6 + u_beat * 0.4;

  gl_FragColor = vec4(clamp(col, 0.0, 1.0), 1.0);
}
Three.js:
// M1 = mesh scale  M2 = rotation speed  M3 = light hue  M4 = wireframe toggle
let mesh, light

function setup(ctx) {
  const { THREE, scene, camera, renderer } = ctx
  renderer.setClearColor(0x000000)

  const geo = new THREE.IcosahedronGeometry(1, 1)
  const mat = new THREE.MeshStandardMaterial({ color: 0x00aaff, metalness: 0.8, roughness: 0.2 })
  mesh = new THREE.Mesh(geo, mat)
  scene.add(mesh)

  light = new THREE.PointLight(0xffffff, 4, 20)
  light.position.set(3, 3, 3)
  scene.add(light)
  scene.add(new THREE.AmbientLight(0x111111, 1))

  camera.position.z = 3.5
  camera.lookAt(0, 0, 0)
}

function update(ctx) {
  if (!mesh || !light) return
  const { clock, beat, rms, macros, audio } = ctx
  const t = clock.getElapsedTime()

  const speed = 0.1 + macros[1] * 0.9
  mesh.rotation.x = t * speed * 0.4
  mesh.rotation.y = t * speed + beat * 0.8

  const s = (0.5 + macros[0] * 1.0) * (1 + rms * 0.3 + beat * 0.3)
  mesh.scale.setScalar(s)

  mesh.material.wireframe = macros[3] > 0.5

  light.color.setHSL((t * 0.06 + macros[2]) % 1.0, 1.0, 0.5)
  light.intensity = 3 + audio[4] * 8 + beat * 6
}
Shadertoy:
// M1 = scale  M2 = speed  M3 = color hue  M4 = glow

void mainImage(out vec4 fragColor, in vec2 fragCoord) {
  vec2 uv = (fragCoord - 0.5 * iResolution.xy) / iResolution.y;

  float scale = 1.0 + u_macros[0] * 6.0;
  float speed = 0.2 + u_macros[1] * 2.0;
  float bass  = u_audio[4];

  float r = length(uv * scale) + bass * 0.5;
  float v = 0.5 + 0.5 * sin(r * 4.0 - iTime * speed + u_beat * 3.14159);

  vec3 col = 0.5 + 0.5 * cos(6.28318 * (u_macros[2] + v + vec3(0.0, 0.33, 0.67)));
  col *= 0.7 + u_rms * 0.6 + u_beat * 0.4;

  fragColor = vec4(clamp(col, 0.0, 1.0), 1.0);
}
Shadertoy MB — the simplest useful multi-buffer shape: one self-feedback decay-trail buffer plus an Image pass that just displays it (this is also what New pre-fills when Shadertoy MB is selected):
Buffer A — channels: iChannel0 = buffer, ref "A" (self-feedback)
void mainImage(out vec4 fragColor, in vec2 fragCoord) {
  vec2 uv = fragCoord / iResolution.xy;
  vec4 prev = texture(iChannel0, uv) * 0.92;  // decay — tune retention 0.85–0.95

  vec2 center = 0.5 + 0.35 * vec2(cos(iTime), sin(iTime * 1.3));
  float d = length(uv - center);
  float dot = smoothstep(0.03, 0.0, d);

  fragColor = prev + vec4(dot, dot * 0.4, 1.0 - dot, 1.0) * dot;
}
Image — channels: iChannel0 = buffer, ref "A"
void mainImage(out vec4 fragColor, in vec2 fragCoord) {
  vec2 uv = fragCoord / iResolution.xy;
  fragColor = texture(iChannel0, uv);
}
Scene Launcher
The Scene Launcher stores up to 8 complete snapshots of your session state. A single click recalls a saved scene instantly — switching sources, opacity levels, blend modes, effects, macro values, and mod routing all at once. Open it from the Scenes button in the title bar.
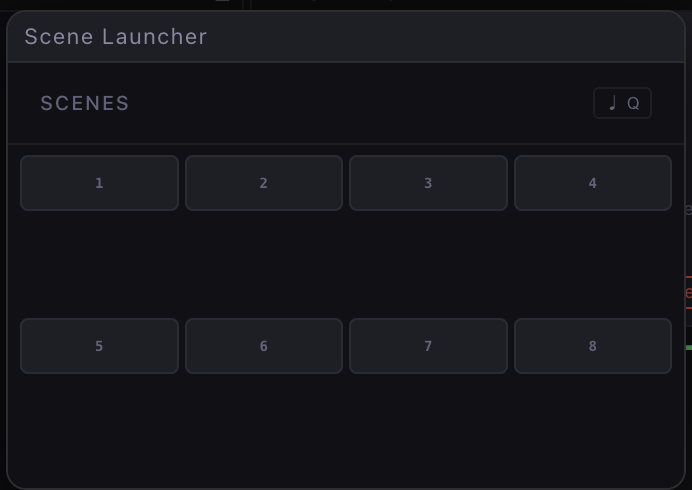
Saving a Scene
Right-click any numbered slot to save the current state. Everything is captured:
- All 8 channel sources and their settings
- Opacity fader positions
- Blend modes and active effects
- Macro knob values
- Mod Matrix routes, LFOs, and envelopes
- XY Pad positions and mode
Recalling a Scene
Click a saved slot to recall it immediately. Use the ♩ Q controls to shape the transition:
| Control | Function |
|---|---|
| ♩ BPM sync | Quantizes recall to the next beat or bar boundary — the scene waits for the downbeat to switch. |
| Q Quantize | Sets the quantize grid — 1 bar, 1/2, or 1/4 note. |
Performance Workflow
- Build a look — set sources, blend modes, effects, and macro positions
- Right-click a slot and save it
- Repeat for each mood or moment you want to move between
- During the performance, click slots to transition between prepared looks
MIDI Map
The MIDI Map connects hardware MIDI controllers to any parameter in SMERGE. Once mapped, your controller operates the software directly with no latency. Open it from the MIDI button in the title bar.
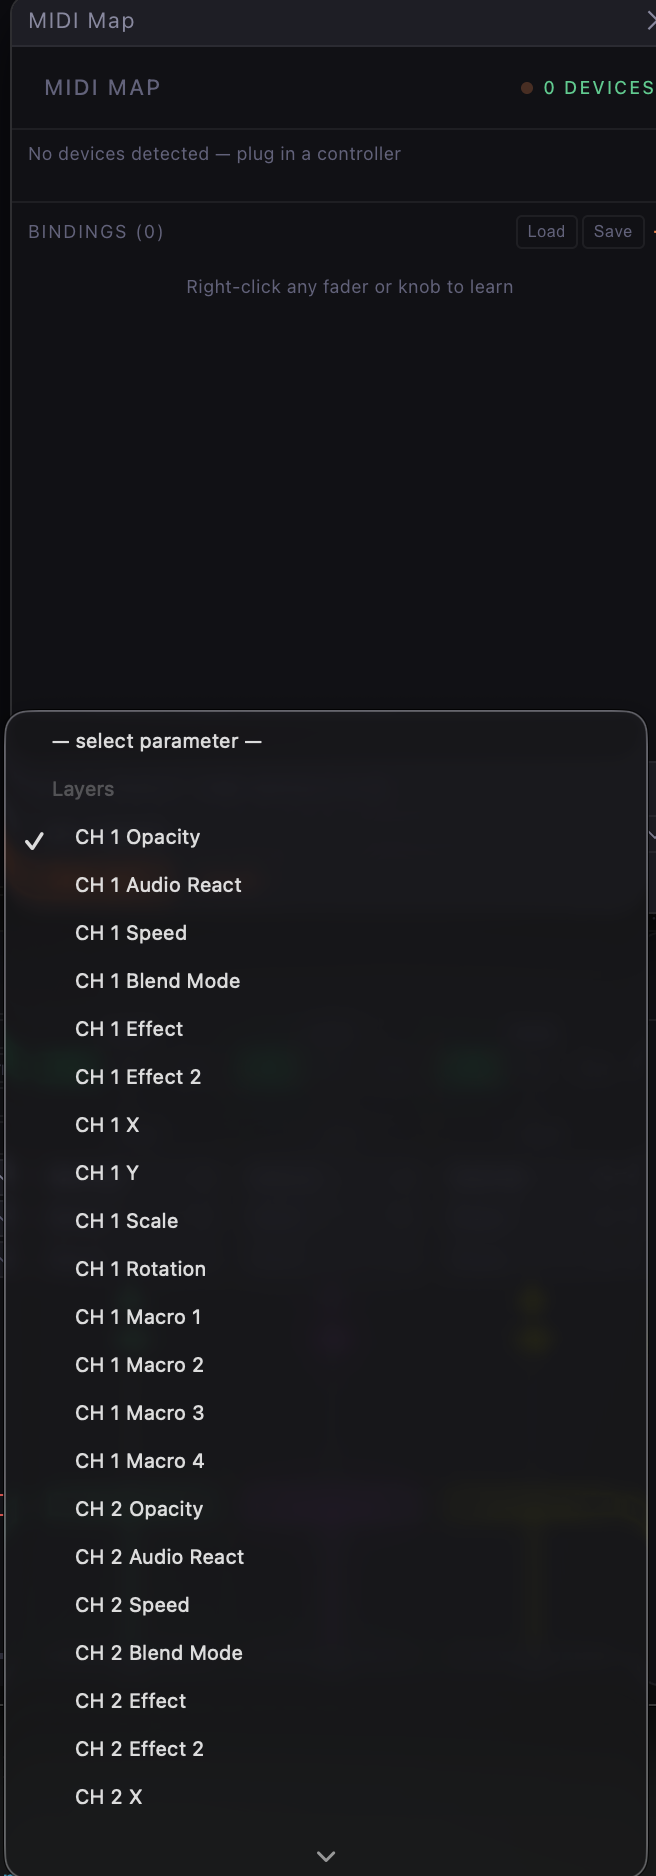
Connecting MIDI
SMERGE requires explicit permission to access MIDI devices. If you see "MIDI access denied", click Connect MIDI and approve the system permission prompt. This is a one-time grant.
Creating a Binding — MIDI Learn
- Open the MIDI Map panel
- Right-click the parameter you want to control — any fader, knob, or macro
- Select Learn MIDI from the context menu — a yellow learn bar appears at the top of the panel showing which parameter is waiting for a CC
- Move the hardware control. Watch the orange activity dot in the panel header — it flashes on every incoming MIDI message, confirming SMERGE is receiving from your device. The last CC received is shown below the device name (e.g.
CC 7 ch1: 64). - SMERGE captures the CC and creates the binding automatically. The learn bar dismisses and the new entry appears in the Bindings list.
Saving and Loading MIDI Maps
| Button | Function |
|---|---|
| Load | Loads a saved .json MIDI map file |
| Save | Exports all current bindings to a .json file |
| + | Manually adds a binding by entering a MIDI channel and CC number |
MIDI maps are saved independently from presets — your hardware setup persists across sessions regardless of which preset is loaded.
Recommended Mappings
| Hardware | SMERGE Target |
|---|---|
| 8 linear faders | CH1–CH8 opacity |
| 8 rotary knobs | M1–M4 across two channels |
| Touchpad / joystick | XY Pad 1 X and Y |
| Trigger pads | Scene slots 1–8 |
| Single knob | Master BPM |
| Button | HIDE toggle per channel |
Tap Tempo / BPM
The Tap Tempo / BPM panel sets the global clock that all time-synced elements lock to — LFOs in BPM sync mode, beat-triggered envelopes, the Step Sequencer, scene quantization, and BPM-synced video playback. Open it from the Tempo button in the title bar. The current BPM and source (AUTO or MAN) are always visible in the title bar.
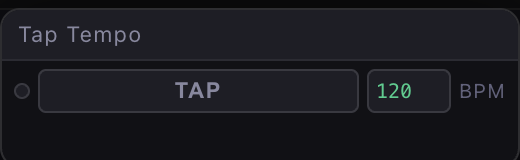
Auto BPM (default)
By default, SMERGE is in AUTO mode. When audio is connected, the beat detector continuously analyzes the incoming signal and updates the global BPM in real time — no tapping required. The detected BPM appears in the title bar with an AUTO badge.
Auto mode works best with a direct feed from your DJ mixer or DAW. For microphone input in a loud room, the detector may lock on a half or double time. If that happens, switch to Manual mode and enter the correct value.
Manual Mode
Click MANUAL to take control of the BPM yourself. In manual mode you can:
| Control | Function |
|---|---|
| TAP | Click repeatedly in time with the music. SMERGE averages the last several taps. Four or more taps gives the most accurate result. Tapping automatically switches to Manual mode. |
| BPM field | Displays the current tempo. Click and type to enter a precise value directly. |
| AUTO button | Switch back to automatic audio-based detection at any time. |
Workflow
For DJ sets with audio input: Leave SMERGE in AUTO mode. Connect your DJ mixer output to your audio interface and select it in Settings → Audio. The BPM will follow the music automatically as you mix.
For live bands or unpredictable tempo: Use TAP mode — tap four or more times on the kick to lock in, then re-tap whenever the tempo shifts.
For prepared or studio sets: Type the BPM directly in Manual mode. If your DAW displays a precise BPM, enter it here for frame-accurate sync.
Settings
The Settings panel configures SMERGE's connections to the outside world — audio input, MIDI devices, video output, and network protocols. Open it with ⌘, or via the app menu.
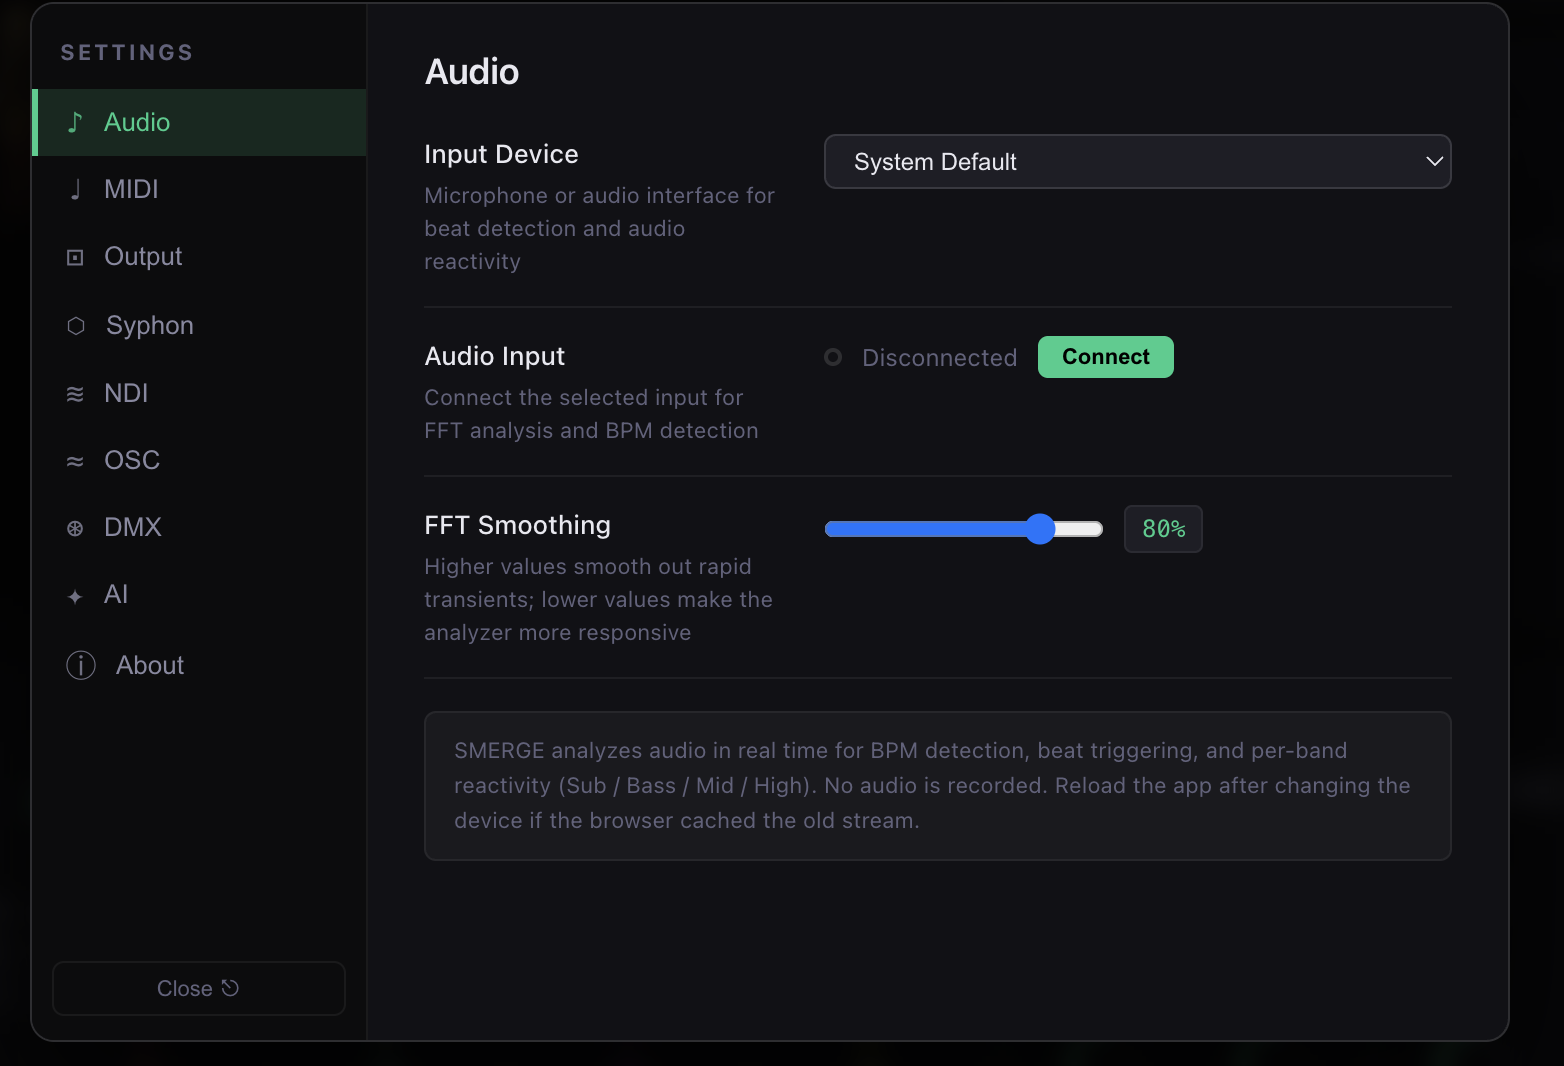
Audio
Input Device
Selects the microphone or audio interface SMERGE uses for audio reactivity and beat detection. For best results in a performance environment, select a dedicated audio interface or virtual audio driver (Loopback, BlackHole) that receives your DJ or DAW output directly.
Audio Input
Shows connection status. Click Connect to activate the selected input. The indicator turns green when the input is live.
FFT Smoothing
| Value | Behavior |
|---|---|
| High (80–100%) | Smooth, fluid reactivity — best for sustained musical audio. |
| Low (0–40%) | Maximum responsiveness — snaps to every transient. Best for percussive material. |
Appearance
SMERGE ships with four UI color themes, selectable from the Appearance tab (the first tab in Settings).
| Theme | Surface | Accent | Character |
|---|---|---|---|
| Phantom (default) | Near-black | Signal green | The original SMERGE look — high contrast, zero distraction. |
| Studio | Cool dark slate | Aqua blue | Slightly lighter panels with a cool, broadcast-monitor feel. |
| Canyon | Warm dark amber | Hot orange | Earthy warm tones — evokes analog hardware and stage lighting rigs. |
| Chalk | Ivory cream | Forest green | Light background — ideal for bright environments or personal preference. |
| Dusk | Dark violet | Dusty rose | Inspired by the SMERGE icon gradient — warm rose fading into periwinkle lavender. |
Your theme choice is saved automatically and restored on next launch. The output and preview windows follow the same theme.
Other Settings Sections
| Section | Purpose |
|---|---|
| Appearance | UI color theme (Phantom / Studio / Canyon / Chalk / Dusk). Persisted and synced to output window. |
| MIDI | MIDI device access. See Chapter 9 — MIDI Map for the full binding workflow. |
| Output | Second display configuration. See Chapter 12 — Output. |
| Syphon | GPU texture share to Resolume, MadMapper, VDMX, OBS on the same Mac. |
| OSC | UDP listener (port 8000) for OSC control. Listens on localhost only by default — enable Network Access in this section to control SMERGE from TouchOSC or other devices on your WiFi/LAN. |
| DMX | Art-Net DMX512 output — enable, set the destination IP and universe, and route mod sources to DMX channels. See Chapter 14 — Art-Net / DMX. |
| AI | API key management for AI shader generation. Supports Claude, ChatGPT, Gemini, and Ollama. See Chapter 15 — AI Shader Generator. |
| About | Application version, build number, and AortaLabs credits. |
Output
The Output panel controls how SMERGE sends its composited video to the world — a second display, other applications on the same Mac, a network stream, or a recorded file. It also contains the projection mapping tools: Projector Preview and Projection Surfaces. Open it from the Output button in the title bar.
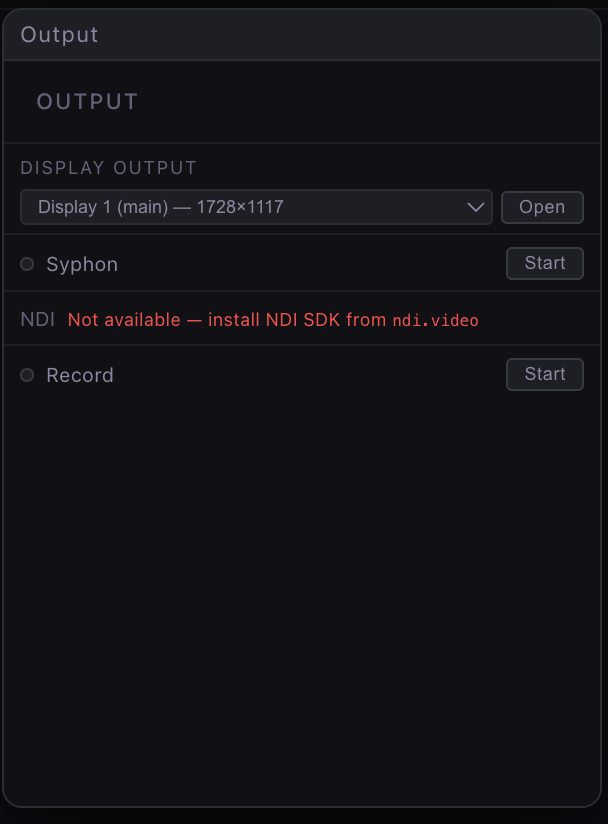
Display Output
Sends SMERGE's live output to a connected display in fullscreen.
| Control | Function |
|---|---|
| Display dropdown | Lists all connected displays. Select the projector, LED wall controller, or monitor for visual output. |
| ↺ | Refresh the display list — use this if you connect a display after launching SMERGE. |
| Open | Launches a fullscreen output window on the selected display at native resolution. |
Projector Preview
Opens a resizable window on your laptop screen that shows exactly what the projector is rendering — the same pixel-accurate output at half resolution (960×540). Use it to monitor the projection while the projector is aimed at a surface you cannot see directly from your laptop.

Projection Surfaces
The Projection Surfaces section maps SMERGE's output onto one or more physical surfaces. Each surface is an independent region of the projector image with its own warp, its own crop of the composition, and its own soft-edge blend. A single surface covering the whole frame behaves exactly like a classic corner-pin keystone correction; several surfaces let you map multiple objects from one composition, or blend two projectors edge-to-edge.
Every surface has four parts:
| Part | What it does |
|---|---|
| Warp mode | None (place and crop only, no warp), Corner Pin (projective keystone/angle correction), or Mesh (a grid of control points for curved and irregular surfaces). |
| Output placement | Where on the projector this surface is drawn, and — in Corner Pin mode — the four corners that shape its warp. |
| Input crop | Which part of the composition this surface shows. Leave it full to show everything, or crop it so each mapped object shows a different region. |
| Edge Blend | Soft brightness falloff on any edge, for seamlessly overlapping two or more projectors. |
The Surface List
Each row is one surface: a colored dot, its name, its warp mode, an enable toggle (◉ / ○), and a delete button. Click a row to edit that surface below. + Add creates a new surface — adding the second one automatically splits the canvas into left and right halves, the fast path for a two-projector setup. The 🔓 / 🔒 button locks the mapping (see Venue Persistence below).
Editing a Surface
Choose a warp mode, then use the Output and Input tabs above the preview:
- Output tab — in Corner Pin mode, drag the four colored dots to shape the warp (TL red, TR green, BL blue, BR yellow). The dashed frame shows where the surface sits on the projector; set its exact position and size with the X / Y / W / H fields. Reset Corners removes the warp.
- Input tab — drag the green rectangle to choose which part of the composition this surface shows, and drag its bottom-right handle to resize. The X / Y / W / H fields give exact values.
Mesh Warp — Curved and Irregular Surfaces
Corner Pin only bends the four corners, which is perfect for flat panels at an angle but can't follow a curved wall, a cylinder, or an object with a bowed face. Mesh mode gives you a grid of control points you can push and pull to wrap the image around any shape.
Set the surface's warp mode to Mesh, then on the Output tab:
- Drag any control point to warp that part of the image. The blue grid shows the current shape.
- Grid — choose the control density: 2×2, 4×3, 8×6, or 16×12. Changing it keeps your current warp (the points are resampled onto the new grid), so start coarse and add detail where you need it.
- Smooth / Linear — Smooth curves the image between control points (best for cylinders and domes); Linear keeps straight segments (best for faceted or flat-panel surfaces).
- Barrel / Pincush — one-click lens presets that bulge the grid outward or pinch it inward, a fast starting point for correcting projector lens distortion.
- Reset — return the grid to flat.
Calibration Workflow
- Open the Output panel and click Open to send SMERGE to the projector display.
- In the Source Manager, assign Test Corners or Test Grid (Generators → Mapping) to a channel at full opacity so you have an alignment reference on the surface.
- Select the surface, set its warp mode to Corner Pin, and open the Output tab.
- Drag each colored corner dot to match the physical corner of your surface. Edits apply to the projector live — watch the actual projection (or the Projector Preview) as you drag.
- Switch to Test Grid to confirm the warp is even; grid lines should sit straight and parallel to the surface edges.
- Replace the test pattern with your content. The calibration stays put.
Camera-Assisted Calibration
Instead of dragging corners by eye, you can point a camera at the projection and let SMERGE solve the warp for you. This works entirely in the camera image, so you never have to guess how a projector-space corner relates to a spot on the physical surface.
Select a surface and click 📷 Calibrate with Camera…. In the dialog:
- Pick your camera from the dropdown. Its live view fills the dialog. (Aim it so it sees the whole projection; open the Output window if the markers aren't showing.)
- SMERGE projects four coloured markers. Click each one where the camera sees it, in order: red (top-left), green (top-right), blue (bottom-left), yellow (bottom-right).
- Four handles appear. Drag them onto the corners of the surface you want the image to fill.
- Click Apply Calibration — SMERGE computes the corner-pin so the content lands exactly on that surface.
Two-Projector Edge Blending
To cover a wide surface with two overlapping projectors from a single composition:
- Add a second surface (the canvas auto-splits into two halves).
- Give the two surfaces overlapping input crops — e.g. the left surface shows input X 0 → 0.55, the right shows 0.45 → 1.0, so a shared strip appears on both.
- Turn on Edge Blend for each and raise the facing edge (Right on the left surface, Left on the right surface) until the overlap fades smoothly. Adjust Gamma until the blended seam matches the brightness of the rest of the image — no bright bar, no dark band.
Venue Persistence
Your surfaces are venue state: they are saved automatically and restored on the next launch, so you can switch presets all night without the projectors moving. Loading a preset only changes the mapping if that preset was saved with its own surfaces — a preset with no mapping leaves your calibration alone. For total safety on show night, click the 🔒 lock so preset loads never touch the mapping at all.
Syphon
Shares SMERGE's GPU output frame with other macOS applications in real time — zero encoding latency, no quality loss.
| Control | Function |
|---|---|
| ○ indicator | Green when Syphon is actively broadcasting. |
| Start | Begins publishing SMERGE's output as a Syphon source named SMERGE. |
Compatible receiving applications: Resolume Avenue / Arena, MadMapper, VDMX, OBS.
Record
Captures SMERGE's output directly to a video file on disk.
| Control | Function |
|---|---|
| ○ indicator | Red when recording is active. Also reflected by the REC button in the title bar. |
| Start | Opens a save dialog, then begins recording. Click Stop to finish and write the file. |
Mask Editor
The Mask Editor lets you draw a bezier shape that masks any channel — controlling exactly which part of that layer is visible in the final composite. This is the primary tool for projection mapping: trace the outline of a physical surface, assign a source to fill it, and everything outside the shape disappears.
Open the Mask Editor by clicking the ✒ button in a channel card in the Source Manager. The button is orange-tinted before a mask exists, glows orange when a path exists but is toggled off, and turns blue while the mask is active. Close the editor at any time — the mask continues running silently in the background.
Toolbar
| Control | Function |
|---|---|
| ↩ / ↪ | Undo / Redo — up to 50 steps. Also ⌘Z / ⌘⇧Z. |
| ◈ Shapes ▾ | Shape presets — Circle, Rectangle, Triangle, Diamond. Click a shape to enter draw mode, then click and drag on the canvas to size it. |
| ✒ Pen | Pen tool — click to place anchor points and draw a custom bezier path. |
| ↖ Edit | Edit tool — drag anchor points and bezier handles to refine the shape. |
| ⬧ Move | Move tool — drag the entire mask to reposition it without editing individual points. |
| ⊘ Invert | Invert the mask — hides what was visible and shows what was hidden. |
| ● On / ○ Off | Toggle the mask on or off without clearing the path. |
| Clear | Remove all anchor points and reset the path. |
| Done | Close the editor. The mask stays active in the background. |
Pen Tool — ✒ (P)
The Pen tool is the default mode when no path exists. Use it to draw a custom bezier shape around any surface.
Placing anchors
- Click to place a sharp corner anchor.
- Click and drag to place a smooth anchor with bezier handles — the direction you drag sets the curve tangent.
- Shift + click snaps the new anchor to the nearest 45° angle from the previous one.
Closing the path
- Once you have placed at least 3 anchors, a circle appears around the first anchor when you hover over it.
- Click the first anchor to close the path. The mask activates immediately.
- The editor switches to Edit mode automatically after closing.
Edit Tool — ↖ (A)
Use Edit mode to refine the shape after the path is closed. All anchors and handles are visible simultaneously.
Anchors
- Drag an anchor to reposition it. Shift + drag locks movement to the dominant horizontal or vertical axis.
- Double-click an anchor to toggle between smooth (round transition) and cusp (sharp corner). A blue dot means smooth; orange means cusp.
- Delete / Backspace removes the selected anchor (minimum 3 anchors required).
Bezier handles
- Drag the outgoing handle (brighter diamond) to adjust the curve leaving the anchor.
- Drag the incoming handle (dimmer diamond) to adjust the curve arriving at the anchor.
- For smooth anchors, moving one handle mirrors the opposite handle automatically.
- Hold Alt while dragging a handle to break the smooth link — handles move independently, creating a cusp. Same behavior as Adobe Illustrator's Convert Direction Point.
- Shift + drag a handle snaps it to the nearest 45° angle.
Move Tool — ⬧ (V)
Drag anywhere on the canvas to shift the entire mask without editing individual points. Useful for nudging a finished mask into precise alignment. Shift + drag constrains movement to horizontal or vertical.
Shape Presets
Click ◈ Shapes ▾ to open the presets dropdown and select Circle, Rectangle, Triangle, or Diamond. Selecting a shape activates draw mode — the cursor changes to a crosshair and the hint bar shows instructions.
To place the shape: click and drag on the canvas to define the bounding box. The shape scales live as you drag. Release to commit. Hold Shift while dragging to constrain the shape to equal proportions (a perfect circle or square). Press Esc to cancel without placing anything.
Keyboard Shortcuts
| Key | Action |
|---|---|
| P | Switch to Pen tool |
| A | Switch to Edit tool |
| V | Switch to Move tool |
| ⌘Z | Undo |
| ⌘⇧Z | Redo |
| Shift | 45° snap (Pen/handles) · Axis lock (anchors/Move) · Equal proportions (Shapes) |
| Alt + drag handle | Break smooth link — move handles independently |
| Delete / ⌫ | Remove selected anchor |
| Escape | Cancel shape draw mode, or close the Mask Editor |
Multiple Masks Per Layer
Each channel supports more than one bezier mask simultaneously. To add a second mask to a channel that already has one, open the Mask Editor and use the + Add button in the toolbar. Each mask has its own path, invert state, and on/off toggle — they are all composited together before being applied to the channel.
Multiple masks are useful for complex projection mapping surfaces: define separate shapes for each panel of a multi-surface installation without needing separate channels for each panel.
Copying and Pasting Masks
When you copy a channel in the Fader Bank (right-click a strip → Copy), the mask path, invert state, and on/off status are all included in the clipboard. Paste transfers the complete mask to the destination channel — no redrawing required. This is the fastest way to apply the same projection mapping shape to multiple content layers on the same surface.
Projection Mapping Workflow
SMERGE handles the full projection mapping pipeline in one place — geometric correction, surface masking, and live monitoring — without requiring separate mapping software.
Step 1 — Geometric Correction (Corner Pin)
- Connect your projector and open the Output panel. Click Open to send SMERGE fullscreen to the projector display.
- Open the Projector Preview window so you can monitor the output on your laptop.
- Assign Test Corners (Generators → Mapping) to a channel and bring it to full opacity. Four colored corner markers appear on the surface.
- Enable Corner Pin in the Output panel. Drag the colored dots to match the physical corners of your projection surface — use the Projector Preview to judge alignment.
- Switch to Test Grid to verify the warp is even. Grid lines should appear straight and parallel to the surface edges.
Step 2 — Surface Masking (Mask Editor)
- Assign a Camera source to one channel at around 50% opacity — this gives a live reference of the surface visible through your content layers.
- Assign your video or generator source to another channel at full opacity.
- Click ✒ on the content channel to open the Mask Editor. Use the Pen tool to trace the outline of the surface.
- Close the path by clicking the first anchor. The source is now masked to the shape.
- Switch to Edit mode and fine-tune anchor positions and curves until the mask fits precisely.
- Lower the camera channel opacity or hide it entirely when finished.
Art-Net / DMX
SMERGE can output Art-Net DMX512 packets over UDP, letting it drive lighting fixtures, LED controllers, haze machines, or any DMX-compatible device in your rig alongside the visuals. Art-Net carries standard DMX512 data over a regular Ethernet or Wi-Fi network — no dedicated DMX interface or USB dongle required.
Enable DMX Output
Open Settings → DMX. Click Enable to start broadcasting Art-Net packets.
| Setting | Description |
|---|---|
| DMX Output | Enable / Disable button. When enabled, SMERGE sends Art-Net packets at the frame rate. |
| Art-Net IP | Destination IP address. Use 255.255.255.255 (default) to broadcast to every device on the subnet, or enter a specific node IP to address one controller directly. |
| Universe | Art-Net universe number (0–32767). Match this to the universe configured on your lighting controller. |
| Channel Count | Number of DMX channels to expose (1–512). Only channels you actually use need to be enabled — keep this low for efficiency. |
Channel Map
When DMX is enabled, the Channel Map appears in Settings — a live bar display showing the current value (0–255) of every active DMX channel. This lets you verify signal flow before connecting physical fixtures.
Routing DMX Values from the Mod Matrix
DMX channels are driven by the Mod Matrix, not set to fixed values. Any modulation source — LFO, envelope, audio band — can be routed to a DMX channel target:
- Open the Mod Patch Bay.
- In the target list, scroll to the DMX section — channels appear as
dmx/ch-1throughdmx/ch-N. - Drag a source node to the target to create a connection. The DMX channel will mirror that source's 0.0–1.0 range, scaled to 0–255.
This design means DMX output is entirely audio-reactive and BPM-synced through the same modulation system that drives your visuals — lamps, strobes, and washes can breathe and pulse in perfect time with the video.
dmx/ch-1, dmx/ch-2, dmx/ch-3.Typical Setup
- Connect your Mac and the lighting controller to the same Ethernet switch or Wi-Fi network.
- Note the Art-Net universe your controller listens on (often Universe 0).
- In SMERGE Settings → DMX, set the IP to
255.255.255.255, the Universe to match, and Channel Count to cover your fixture's footprint. - Click Enable. Verify signal in the Channel Map.
- Open the Mod Patch Bay and route audio, LFO, or envelope sources to the relevant
dmx/ch-Ntargets. - The lights follow the music — just like the visuals.
AI Shader Generator
SMERGE includes a built-in AI code generator that can write custom GLSL fragment shaders from a text description. Access it via the ✦ AI button inside the Shader Editor. Describe the visual you want in plain language — "a golden fibonacci spiral reacting to bass" — and the AI streams working shader code directly into the editor. Compile, adjust, and save it like any other shader.
Setup — Adding an API Key
Open Settings → AI. SMERGE supports four providers:
| Provider | Model | Notes |
|---|---|---|
| Claude (Anthropic) | claude-3-5-sonnet-20241022 (or newer) | Best overall quality for shader code. Requires an Anthropic API key. |
| ChatGPT (OpenAI) | gpt-4o (or newer) | Strong results. Requires an OpenAI API key. |
| Gemini (Google) | gemini-2.0-flash (or newer) | Fast and free tier available. Requires a Google AI Studio API key. |
| Ollama (Local) | Any Ollama-compatible model | Fully offline — no API key needed. Requires Ollama running locally. |
Paste your API key into the key field for the provider you want to use and click Save Key. Keys are encrypted at rest using Electron's secure storage and never leave your Mac — they are not shared with other users and are not accessible to the renderer process.
Ollama Setup
If you prefer to run AI locally, install Ollama (ollama.com) and pull a code-capable model such as deepseek-coder-v2 or qwen2.5-coder:7b. Set the Ollama Host in Settings → AI to http://localhost:11434 (the default). No API key is required.
Generating a Shader
- Open the Shader Editor and click ✦ AI in the top-right corner.
- Type your description in the prompt field.
- Press Generate (or ⌘↵).
- The AI streams code into the editor in real time. A progress indicator shows it is working.
- When generation completes, click Compile to test the shader. If it works, give it a name and click Save.
- Press ✕ Cancel at any time to stop mid-stream.
Writing Effective Prompts
The AI is trained to write shaders in the 80–120 line range using GLSL ES 1.0 (WebGL 1.0). Prompts that specify visual character, audio reactivity, and a color palette tend to produce the best results:
| Prompt Style | Example |
|---|---|
| Visual + palette + audio | "A grid of neon squares that scatter apart on u_beat and pulse with u_rms. Cyan/magenta IQ palette." |
| Pattern + geometry | "Tiled hexagons with hash-based color variation, each cell size driven by u_macros[0]." |
| Organic + motion | "Fluid, slow-moving plasma field using sin/cos in multiple frequencies. React bass bins to u_audio[2]." |
| Raymarching (advanced) | "Raymarched torus SDF with soft shadows. Rotation speed tied to u_beat." |
Useful uniforms to mention in prompts
u_beat— smooth 0→1 envelope that fires on audio transientsu_rms— overall loudness (0–1)u_audio[0]tou_audio[63]— FFT bins from sub-bass to trebleu_macros[0]tou_macros[3]— M1–M4 knobs, great for user-controlled parametersu_time— elapsed seconds for continuous animationu_bpm— current BPM as a float
Truncation and Retry
If a shader is complex and the AI runs out of tokens before finishing, SMERGE detects the truncation (the code will end mid-function rather than with a closing }) and shows a ↩ Retry shorter button. Clicking it re-sends the same prompt with an explicit instruction to keep the shader under 100 lines — trading some complexity for a complete, working result.
Multi-Buffer Shaders
Generating a Shadertoy MB shader works the same way but runs as several calls behind the scenes instead of one: a planning step first decides how many buffers the technique needs and how they're wired, then one focused call fills in each pass in turn. This is why a 3- or 4-buffer simulation still completes reliably rather than running out of output budget partway through — each call only has to write one pass. Describe the technique in plain language, the same as any other shader ("Conway's Game of Life reseeded on the beat," "Gray-Scott reaction-diffusion coral growth," "curl-noise fluid advection with dye density") and the finished bundle loads into the tabbed multi-buffer editor. See Multi-Buffer Shadertoy Shaders in Chapter 7 for the editor itself and prompting tips specific to feedback/simulation techniques.
Security Notes
- API keys are stored encrypted using Electron safeStorage (OS-level encryption). Plaintext keys only exist in the main process during active use.
- The renderer (the visual portion of the app) never has access to your API keys — only a boolean "key is set" status.
- Generated GLSL code runs on the GPU and cannot make network requests or access your filesystem.
- Each user needs their own API key — there is no shared or embedded key in SMERGE.
Step Sequencer
The Step Sequencer is a 16 or 32-step pattern engine that automates track opacity and macro parameters in sync with the global BPM clock. Unlike the Mod Patch Bay (which produces continuous modulation), the sequencer fires discrete, programmable values at rhythmic intervals — perfect for strobing effects, rhythmic crossfades, macro sweeps timed to the music, and building repeating visual compositions that breathe with the beat.
Open the sequencer from the Seq button in the title bar. It opens in its own floating window so it can sit on a second monitor or beside your main SMERGE workspace.
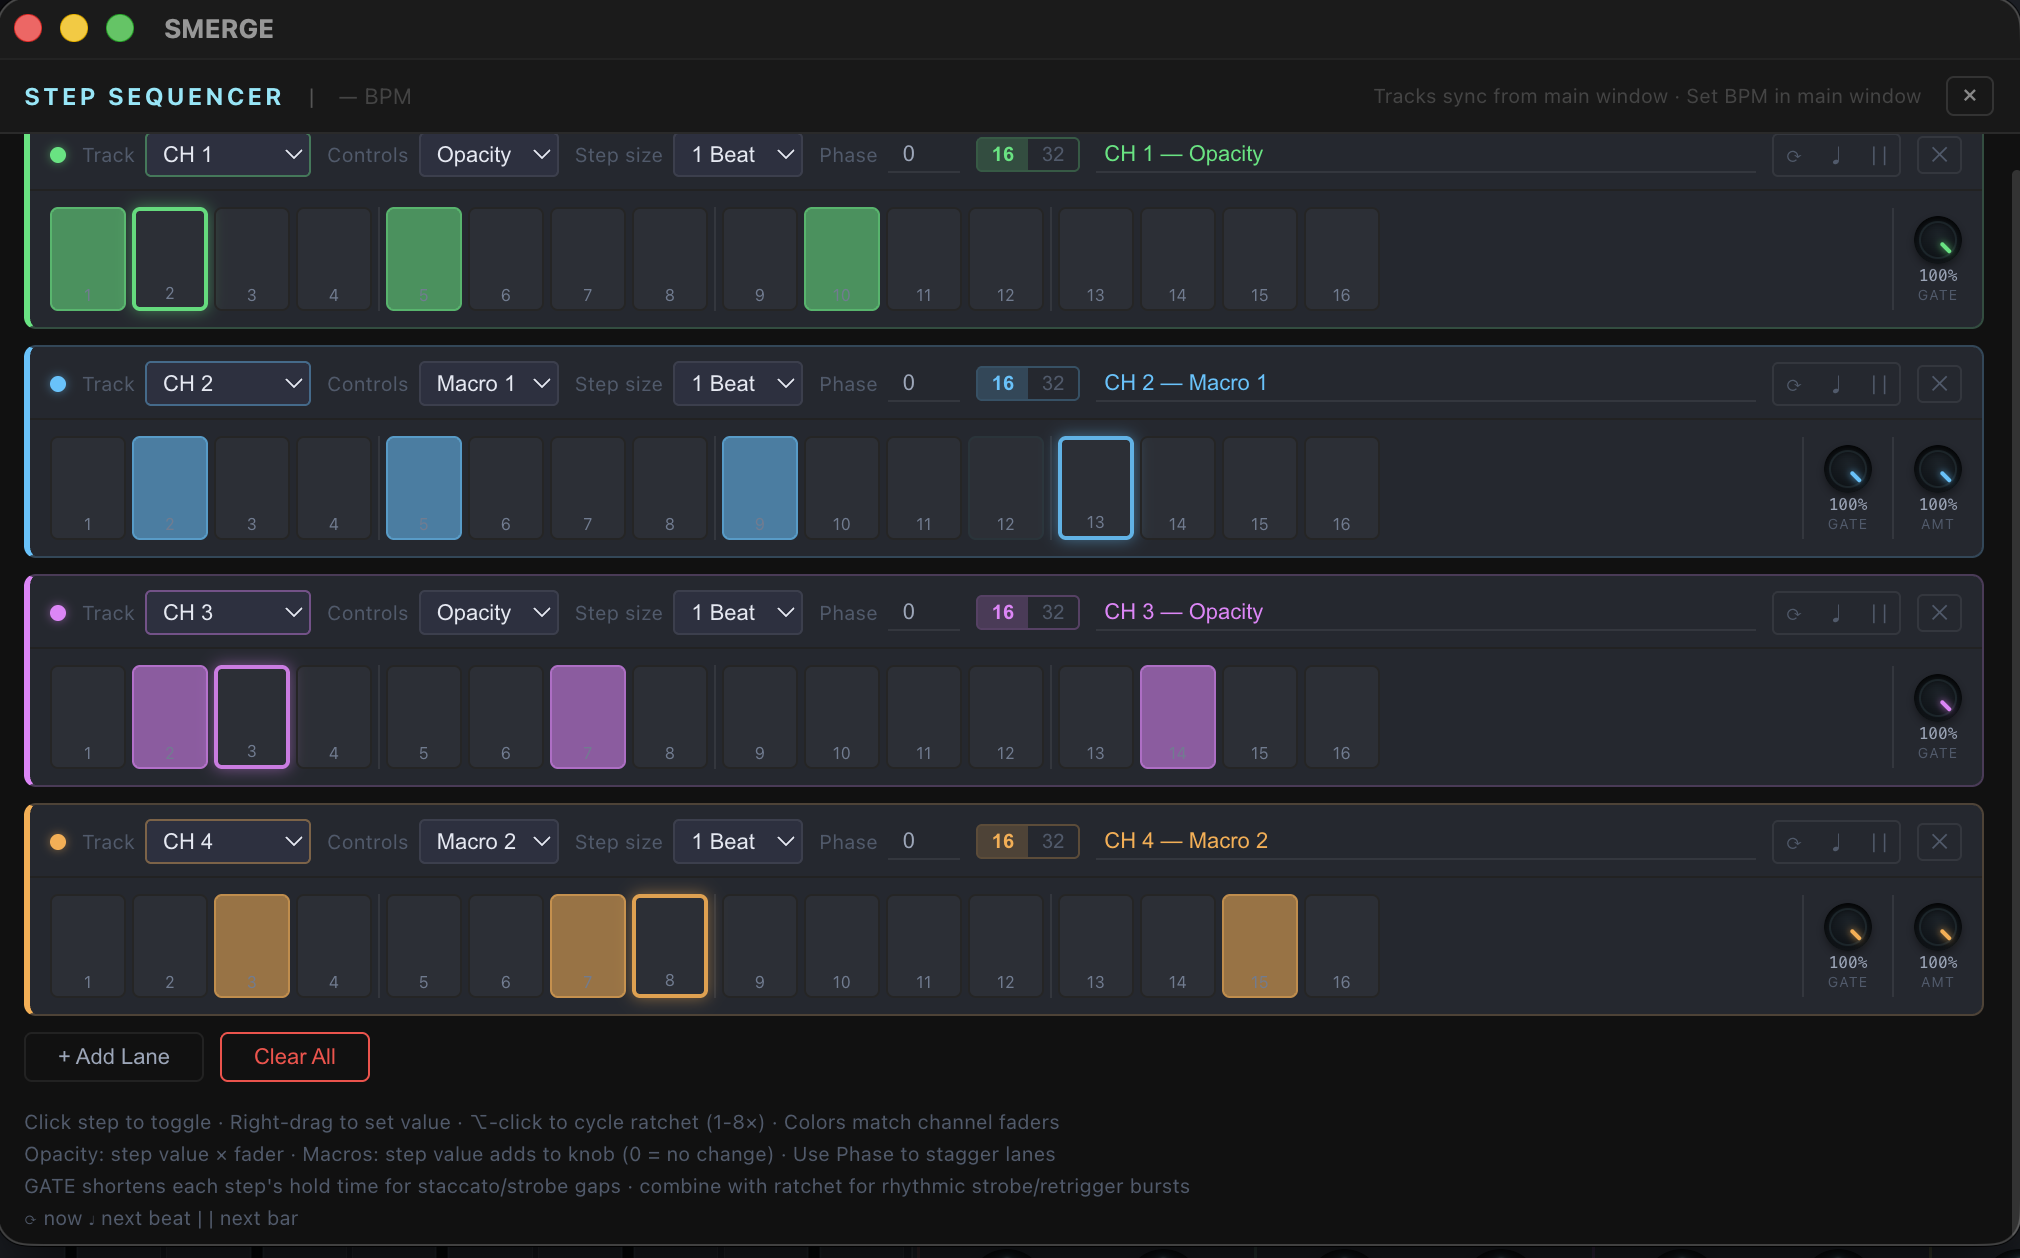
Lanes
The sequencer is organized into lanes. Each lane targets one track (channel) and one parameter. You can have as many lanes as you need — one lane might drive CH 1 opacity, another might drive CH 2's Macro 1. Lanes are color-coded to their track's channel color so you can tell them apart at a glance.
When you first open the sequencer with tracks loaded, SMERGE seeds one lane per active track (up to four) so you have something to work with immediately.
Lane Controls
| Control | Function |
|---|---|
| Track | Selects which channel (CH 1–8) this lane controls. The lane border and step colors update to match that channel's color. |
| Controls | The parameter to automate: Opacity, or Macro 1–4. |
| Step size | Clock division for how often the pattern advances. Options range from 1 Bar (4 beats) down to 1/32 (very fast). Common choices: 1 Beat for slow sweeps, 1/4 for 16th-note patterns. |
| Steps | Toggle the pattern length between 16 and 32 steps. All existing step data is preserved when switching — a 32-step lane simply reveals the second half of the grid. Both halves are visible and scrollable in the step row. |
| Phase | Start offset (0 to stepsLen−1). Shifts which step fires first on the initial clock tick, so lanes targeting different tracks can be out of phase with each other. See Phase Offset below. |
| Reset (⟳ ♩ ||) | Snap the lane's playhead back to step 1 (at the phase offset). ⟳ resets immediately. ♩ waits for the next beat before resetting. || waits for the next bar boundary. The button glows in the lane's color while a beat/bar reset is pending. |
| Lane name | Editable label for the lane — auto-filled when you select a track and parameter. |
| ✕ | Remove this lane. |
Step Grid
Each lane contains 16 or 32 steps arranged left to right. Steps advance one at a time on each clock division tick — the current step is highlighted with a glowing border in the track's color. A vertical fill bar inside each step shows its value (taller = higher). In 32-step mode, groups of 4 steps are separated by thin dividers, and a thicker divider marks the halfway point between step 16 and 17.
| Action | Result |
|---|---|
| Click a step | Toggle it on or off. |
| Click and drag across steps | Paint multiple steps at once — all steps touched take on the same state as the first step you clicked (on or off). Great for quickly filling or clearing a region. |
| Right-drag a step (up/down) | Adjust the step's value from 0 to 100%. The fill bar updates in real time. |
| ⌥-click a step | Cycles that step's ratchet count: 1× → 2× → 3× → 4× → 6× → 8× → back to 1×. See Ratchet and Gate below. |
Ratchet and Gate — Rhythmic Strobe Effects
Beyond simple on/off steps, each step can ratchet — subdivide into rapid retriggers within its own clock division — and each lane has a gate length that shortens how long a step holds before cutting off. Combined, these produce the stutter/strobe/retrigger bursts common in music-video edits, without needing a faster Step size for the whole lane.
| Control | Function |
|---|---|
| ⌥-click a step | Cycles that step's ratchet count: 1× → 2× → 3× → 4× → 6× → 8×. A ratcheted step shows small tick marks at its top — one per sub-pulse — so you can see which steps will retrigger at a glance. |
| GATE knob | Sets the lane's gate length as a fraction of each step's hold time. 100% (default) holds for the full step, same as before; lower values cut the step off early, leaving a gap before the next one fires. Combine with ratchet for staccato retrigger bursts rather than a smooth roll. |
| AMT knob | (Macro lanes only — hidden for Opacity lanes.) Scales how much the lane's active steps shift the target macro above its current knob position. Sequencer values are additive, not a hard override: 0 = the lane has no effect regardless of step values; 100% = full effect. |
A step with ratchet 4× on a 1/4-beat lane retriggers four times within that quarter note — at 120 BPM, a 1/4-beat step lasts 0.5 s, so a 4× ratchet fires roughly every 125 ms, a classic Elektron-style ratchet roll. Ratchet count and gate length work together: a high ratchet with a short gate creates crisp, separated strobe pulses; a high ratchet with a long gate blurs into a rapid flutter.
The Fader Is the Master
The track fader acts as the master ceiling for the sequencer. Step values are multiplied by the fader rather than replacing it:
- Fader at 100%, step at 100% → output opacity: 100%
- Fader at 50%, step at 100% → output opacity: 50%
- Fader at 50%, step at 50% → output opacity: 25%
- Fader at any value, inactive step (off) → output opacity: 0% (track muted for that step)
This means you can use the fader to set a track's maximum brightness and let the sequencer pattern fire within that range. Pulling the fader down during a performance reduces the sequencer's effect proportionally — useful for live mixing.
Phase Offset — Staggering Lanes
When two lanes use the same Step size, they start advancing together from step 1 on the first clock tick. If both lanes have the same alternating pattern (e.g., every other step active), they fire and silence together — CH 2 will always be hidden behind CH 1 when both are active, and both will be off at the same moment.
The Phase control solves this. Setting one lane's Phase to half the step count shifts it directly opposite — so when CH 1 is active, CH 2 is inactive, and vice versa. This creates true alternating crossfades between channels.
| Phase value | Offset (16-step) | Offset (32-step) | Common use |
|---|---|---|---|
| 0 | No offset — starts at step 1 | No offset | Default for your first lane |
| 4 | Quarter cycle ahead | ⅛ cycle | Four-lane round-robin (16-step) |
| 8 | Half cycle — directly opposite | Quarter cycle | Two-lane alternating crossfade (16-step) |
| 12 | Three-quarter cycle | ⅜ cycle | Four-lane sequencing, lane 3 (16-step) |
| 16 | — | Half cycle — directly opposite | Two-lane alternating crossfade (32-step) |
Adding and Clearing Lanes
- + Add Lane — Adds a new blank lane. Set the target track and parameter to start using it.
- Clear All — Deactivates every step in every lane without removing the lanes. A two-click confirm prevents accidental wipes. Use this to quickly silence all sequencer automation without losing your lane routing.
BPM Sync
The sequencer always runs off the global clock set in the Tap Tempo / BPM panel (Ch. 10). In AUTO mode this follows detected audio BPM; in Manual mode you control it. All lanes with the same Step size advance on exactly the same clock edge, so patterns across multiple lanes stay perfectly in sync regardless of how many lanes you have.
Changing the BPM in either mode takes effect immediately — the sequencer will speed up or slow down to match. The current playhead position is maintained; it does not reset on tempo change.
Presets
All sequencer lanes and step data are saved and loaded with your .smx preset files. The entire pattern — lane routing, step states, values, division, and phase — is fully captured. Starting a New preset clears all lanes.
Creative Techniques
| Technique | How to set it up |
|---|---|
| Rhythmic strobe | One lane targeting CH opacity. Alternate active/inactive steps every step or every two steps. Step size: 1/4 or 1/8 for fast strobing, 1 Beat for slow pulse. |
| Channel crossfade | Two lanes — CH 1 and CH 2 opacity — with Phase offset 8 and identical alternating patterns. As CH 1 fires on steps 1,3,5..., CH 2 fires on steps 2,4,6..., creating a back-and-forth cut between sources. |
| Macro sweep | One lane targeting Macro 1 on a shader generator. Set right-drag values across the 16 steps to create an automated sweep — ascending, descending, or a custom curve — that repeats every cycle. |
| Polyrhythm | Two lanes with different Step sizes — e.g., one at 1 Beat, another at 1/2 Beat. The two patterns drift in and out of phase over time, creating evolving, non-repetitive composites. |
| Stutter cut | A lane at 1/8 or 1/16 Step size with a short burst of active steps (e.g., steps 1–3 active, 4–8 inactive). This fires a rapid burst of opacity then holds off — useful for glitch effects timed to drops or breaks. |
| Ratchet strobe burst | A single active step set to ratchet 6× or 8× (⌥-click to cycle) with the lane's GATE reduced to ~40%. Fires a rapid strobe/retrigger burst exactly on that one beat — the music-video "flash cut" effect — without needing to speed up the whole lane's Step size. |
| Quantized scene prep | Combine the sequencer with the Scene Launcher (Ch. 8) — trigger scene changes at the bar or half-bar level in Scene Launcher while the sequencer drives opacity transitions on the new layers, creating a layered, rhythmically composed live set. |
| Long-form 32-step arc | Switch a lane to 32 steps and use Step size of 1 Beat. The full pattern takes 32 beats (~2 bars at 120 BPM) before looping — long enough to build and release tension across a phrase. Set the first 16 steps as an ascending macro sweep (right-drag to set values), leave steps 17–32 at full brightness for the payoff, then loop. |
Live Reset
Each lane has three reset buttons in the top-right corner. Use them to re-sync a lane that has drifted out of phase with the music, or to deliberately fire a pattern from the top at a dramatic moment:
- ⟳ (Now) — Snaps the playhead back to step 1 immediately on the next clock tick. Use for instant re-sync when a lane has slipped.
- ♩ (Beat) — Waits for the next beat boundary before resetting. The button glows while armed. Use when you want a clean reset without disrupting the current beat.
- || (Bar) — Waits for the next 4-beat bar boundary. The most musically natural option — the lane resets exactly on the downbeat so the pattern starts fresh in time with the music.
Ableton Link
Ableton Link is a zero-configuration tempo-sync protocol that keeps the BPM and beat phase of multiple apps in lock-step over a local network or between apps on the same machine. When Link is active in SMERGE, its LFOs, beat-triggered envelopes, gates, step sequencer lanes, and scene quantization all lock to the shared Link session.
Enabling Link
In the Fader Bank BPM display, click the LINK button (shown in teal when active). SMERGE immediately joins — or creates — the Link session on the local network. No IP addresses or ports to configure; Link discovers peers automatically over Wi-Fi or Ethernet.
| Element | Description |
|---|---|
| Peers chip | Shows how many other Link-enabled apps are connected. Turns teal when at least one peer is found. |
| Quantum | Number of beats per sync cycle (default 4 = one bar). Adjust with the number field next to the peers chip. |
Tempo Control
While Link is active the BPM shown in the Fader Bank reflects the shared session tempo. Changing the tempo from any connected app updates all peers simultaneously. SMERGE's Tap Tempo and manual BPM are disabled in Link mode — tempo changes must come from the session.
Stopping Link
Click LINK again, or switch to AUTO or MAN mode, to leave the session. SMERGE's BPM returns to its last standalone value.
Compatible Apps
Any Link-enabled application works: Ableton Live, Traktor Pro, Rekordbox, Serato DJ, TouchDesigner, Max/MSP, and a wide range of iOS/Android apps (Koala Sampler, AUM, Patterning, and others).
Per-App Audio Capture
SMERGE can capture the audio output of any running application on macOS using the ScreenCaptureKit framework — without virtual audio drivers or cable patches. This lets SMERGE analyze audio from Ableton Live, Traktor, Spotify, a browser, or any other app while your main audio interface passes through normally.
Requirements
- macOS 13 Ventura or later
- Screen Recording permission granted to SMERGE in System Settings → Privacy & Security → Screen & System Audio Recording
Enabling Per-App Capture
- Open Settings → Audio.
- Under Per-App Audio Capture, click Enable.
- If prompted, grant Screen Recording permission in System Settings, then return and click Enable again.
- An app picker appears listing all currently running applications.
- Select the app whose audio you want SMERGE to analyze.
- Click Connect. The audio analyzer now reads from that app's output — Sub, Bass, Mid, High, RMS, and Beat all respond.
Use Cases
| Scenario | Setup |
|---|---|
| VJ alongside a DJ in a different DAW on the same Mac | Select the DJ's DAW in the app picker — no interface patch needed. |
| React to a streaming playlist | Select the browser or Spotify. |
| Stem-reactive visuals from Live | Select Ableton Live — Sub/Bass/Mid/High bands drive from its output. |
Permissions Note
macOS requires Screen Recording permission because the ScreenCaptureKit API used for per-app audio is the same framework used for screen capture. SMERGE only accesses audio — no screen pixels are captured or stored at any point.
CV / M-Gate Input
SMERGE can read control voltages (CV) and gate signals from a Eurorack modular system or any CV-capable hardware, using a DC-coupled audio interface as the bridge. This turns your modular into a real-time modulation source in the Mod Patch Bay — no special hardware beyond a DC-coupled interface is required.
What Is a DC-Coupled Interface?
A standard audio interface blocks DC and very low frequencies (AC-coupling). A DC-coupled interface passes signals down to 0 Hz, which is required for CV that holds a steady voltage — for example, a pitch CV held at +2 V.
Compatible interfaces include:
- Expert Sleepers ES-8 / ES-9
- RME Fireface UCX II, UFX+, Babyface Pro FS
- MOTU 828es, UltraLite-mk5
- Focusrite Scarlett 4th Generation (select models)
- Befaco IN112
Interfaces that are not DC-coupled (most consumer interfaces) will not pass CV — slow ramps and held voltages are cut. Fast gates may still pass as audio-frequency signals.
Signal Ranges
Eurorack CV is bipolar: −5 V to +5 V. Audio interfaces normalize this to −1.0 to +1.0 (full digital scale). SMERGE maps this to the 0–1 modulation space used throughout the Mod Patch Bay:
| Eurorack | Audio API | Mod value |
|---|---|---|
| +5 V | +1.0 | 1.0 |
| 0 V | 0.0 | 0.5 |
| −5 V | −1.0 | 0.0 |
Use unipolar CV (0–5 V) for parameters that should only go up from their base (opacity, scale, macro knobs driving brightness). Use bipolar CV (±5 V) for parameters centered around a midpoint (rotation, X/Y position).
Gate signals from Eurorack (+5 V high / 0 V low) appear as raw values near +1.0 and 0.0. The M-Gate threshold slider sets the exact point above which the gate is considered open.
Adding CV and M-Gate Sources
No CV or M-Gate inputs exist by default — you add them only if you have DC-coupled hardware connected.
- Open the Mod Patch Bay panel.
- Click + CV for a continuous CV source or + M-Gate for a voltage-threshold gate.
- Click the new source row to open its CV Inspector.
- In the Dev picker, select your DC-coupled interface.
- Set Ch to the physical input channel carrying the CV or gate signal.
- Watch the oscilloscope — you should see the waveform as soon as your hardware sends voltage.
- For M-Gate sources, adjust Thr until the dashed threshold line sits above the noise floor and below the gate's high voltage.
- Drag a cable from the CV or M-Gate source node to any destination in the right column — exactly like an LFO or envelope.
CV Inspector Reference
| Control | Description |
|---|---|
| Icon | ⌇ for CV (continuous waveform), ⊓ for M-Gate. The M-Gate icon lights up when the gate is open. |
| Dev | Audio interface device picker. Updates live when devices are connected or disconnected. |
| Ch | Input channel number (1–8). Match this to the physical jack on your interface. |
| Live readout | Current raw voltage as a number (−1.00 to +1.00), updated ~12 times per second. |
| Oscilloscope | 170 × 58 px rolling waveform, ~3 s of history at 60 fps. Center line = 0 V. M-Gate shows a dashed threshold line. |
| Thr | M-Gate only. Threshold voltage — gate outputs 1 when the signal is above this value, 0 otherwise. |
| × Remove | Deletes the source and removes all cables routing from it. |
Performance Tips
- Normalize at the hardware level. Keep Eurorack outputs below ±5 V to stay within the −1..+1 digital range and avoid interface clipping.
- Use the oscilloscope for calibration. A signal pegged at +1.0 or −1.0 is clipping at the interface input — reduce the Eurorack output level or use a voltage attenuator.
- M-Gate as a trigger: Route a gate to a short ENV (fast attack, medium release) so it fires the envelope on each gate-open rather than holding the parameter high for the full gate duration.
- Combine with LFOs: Route both a slow LFO and a CV source to the same destination — they sum. Your modular adds real-time expression on top of a programmatic sweep.
- M-Gate threshold tuning: Watch the dashed line on the oscilloscope while sending a test gate from your hardware. Drag Thr until the dashed line sits cleanly between the resting voltage and the gate-high voltage.
Media Library
The Media Library is a persistent, searchable catalog of your clips — videos, images, audio, and 3D models — with thumbnail previews. It remembers your media between sessions, so you never have to re-add the same files every time you launch SMERGE. It lives in its own floating window and takes up no space in the main interface.
Opening the Library
Open it any of three ways:
- View → Media Library from the menu bar
- The ⌘L keyboard shortcut
- The LIB button in the Sources panel header
The window floats above the main window and stays visible even over a fullscreen output on the same display, so you can browse and load clips mid-performance.
Adding Media
| Method | What it does |
|---|---|
| + Files | Opens a file picker to add one or more media files. |
| Scan Folder… | Recursively scans a folder and adds every supported media file it finds (skipping duplicates). |
| Drag from Finder | Drop files directly onto the library window to add them. |
| Auto-add on import | On by default — any file you import through the Sources panel is also added to the library automatically, so the catalog fills up as you work. Toggle it in Settings → Library. |
Adding a file that is already in the library is silently skipped — an item's identity is its file path, so you can re-scan folders freely without creating duplicates.
Thumbnails
Thumbnails are generated in the background and appear within a few seconds of adding media:
- Video — a frame sampled a short way into the clip (not frame 0, which is often black on VJ loops), with the clip length shown as a badge.
- Image — a resized preview.
- Audio — a rendered waveform so tracks are recognizable at a glance, with the duration badge.
- 3D models — a generic icon (a live preview is planned for a future update).
Browsing and Searching
- Search — type a name to filter by filename, or start with
#(e.g.#warmup) to filter by tag. - Filter pills — All · Video · Image · Audio · 3D · ★ narrow the grid to one type or to favorites.
- Sort — Newest, Name, Length, or Type.
- Hover-scrub — hover a video card for a moment, then move the mouse left and right across it to scrub through the clip and find the exact section you want.
Loading Clips onto Channels
| Action | Result |
|---|---|
| Drag a card onto a channel strip | Loads that clip on the channel (the strip highlights as you drag over it). You can also drag files straight from the Finder onto a channel. |
| Double-click a card | Loads the clip onto the first empty channel. |
| Right-click → Assign to Layer N | Loads the clip onto the channel you choose. |
A clip that is already loaded as a source is reused rather than duplicated, so assigning the same library item to several channels won't create redundant sources.
Organizing Your Catalog
- Favorite — click the ★ on any card, then use the ★ filter to jump to your go-to clips.
- Tags — select a card and add tags in the detail strip at the bottom, or right-click → Add Tag…. Tag several selected cards at once. Search by tag with
#tag. - Multi-select — ⌘-click to toggle individual cards, Shift-click to select a range. Drag, tag, or remove them together.
- Reveal in Finder — right-click → jump to the file on disk.
- Remove from Library — removes the catalog entry only. It never deletes your original media file.
Where It Lives & Missing Files
The library and its thumbnails are stored in ~/Documents/SMERGE/Library/. The catalog holds references to your files, not copies of them. If a referenced file is moved or deleted, its card is dimmed and marked MISSING the next time you open the library — nothing crashes, and you can remove the stale entry or restore the file.